Getting Started
StackBill Instances are running on virtualized hardware. You can use them standalone or as part of larger, cloud-based infrastructures.
Users can start, stop, reboot, and destroy their own created virtual machines in Stackbill CMP, by giving them complete control over their cloud-based virtual machines.
There are two types of instance deployment types available in the StackBill Cloud Management Portal.
The main difference between these two deployments is that quick deployment is mainly for novice users who have very limited knowledge of cloud computing.
A user with good knowledge of cloud technology can use advance deploy in StackBill CMP.
Quick Deploy in StackBill CMP

- Click on Quick Deploy to create a instance using the Quick Deployment type.
Platform selection
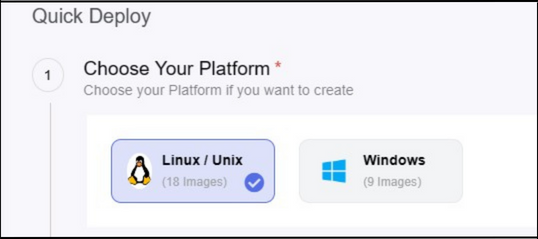
- StackBill CMPs offers you two types platforms. They are: Linux and Windows.
Distribution Types
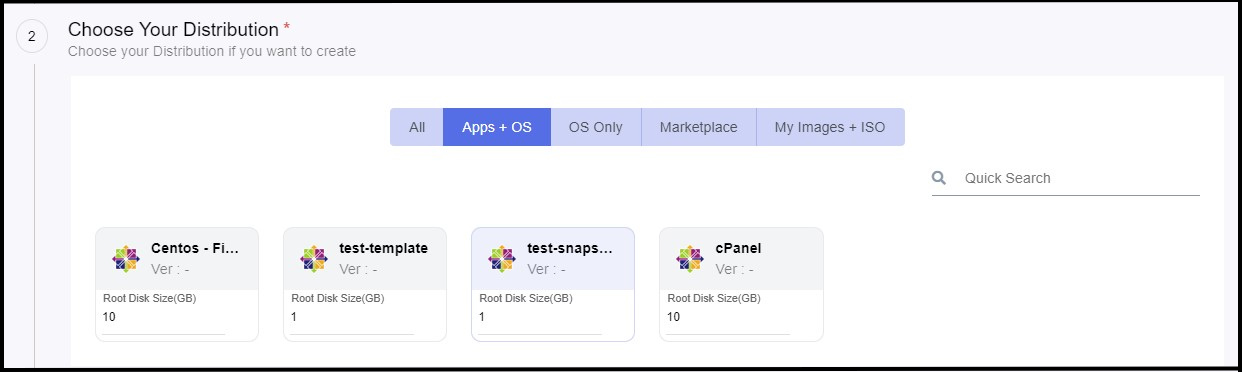
StackBill offers you various types of operating system flavors like Windows Server Editions, Linux, Debian, etc..,
There are 4 types of segregation available in the distribution selection. They are: All, OS only, MarketPlace & My Images + ISO
All - It will display all the OS flavours which are available in the StackBill Cloud Management Portal.
OS Only - It will display only the OS related templates.
Marketplace - StackBill marketplace will offers you launch instances using various type of open source applications in less time.
My Images + ISO - It will display user created OS templates and also it will contains the default ISO images which StackBill will provide automatically.
Compute Plans
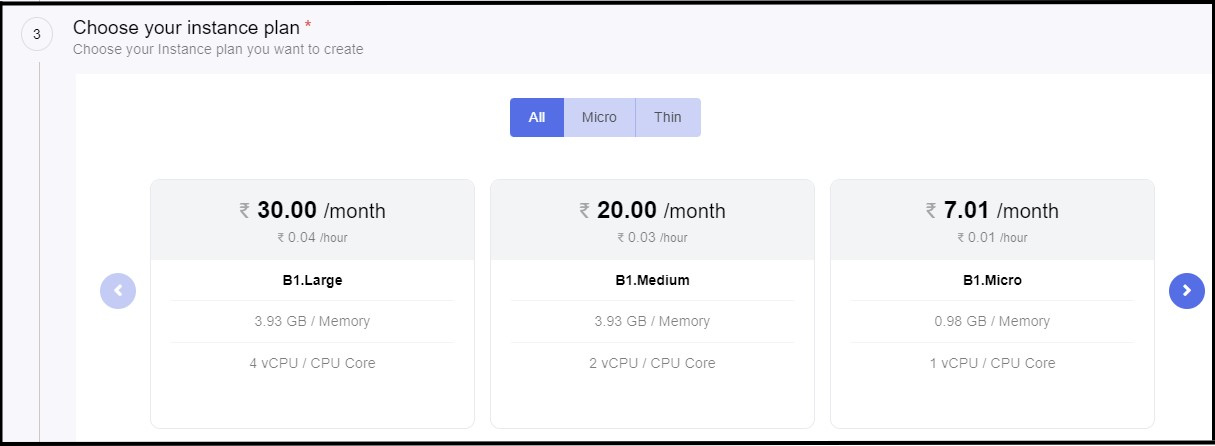
You need to select from the list of plans which are available in the StackBill CMP. These plans will be configured by your StackBill administrator.
Select the appropriate plan for your instance.
Selecting a Network
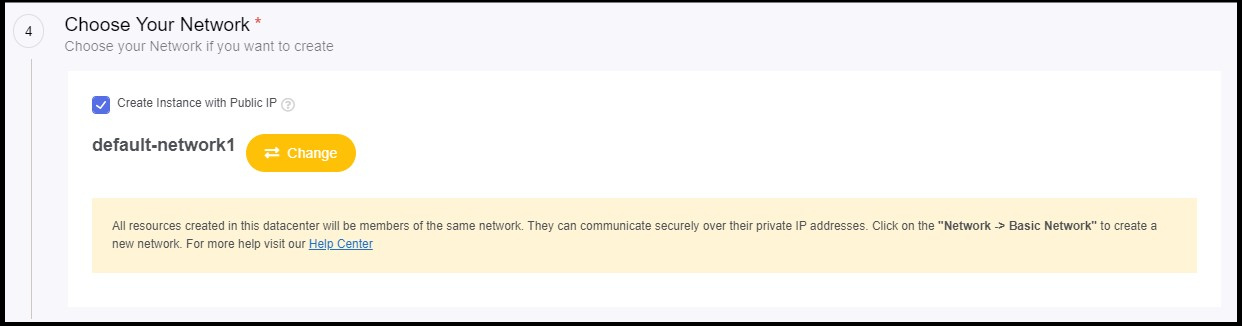
By default, a new network will be automatically created when you create your first instance.
If you need to launch your instance with a public IP address, make sure that you have enabled the option "Create Instance with Public IP"
Note: If you are launch your instance without public IP address, your instance will not be accessible from internet. It will be accessible only from your instance internal network.
Configuring Cloud Firewall
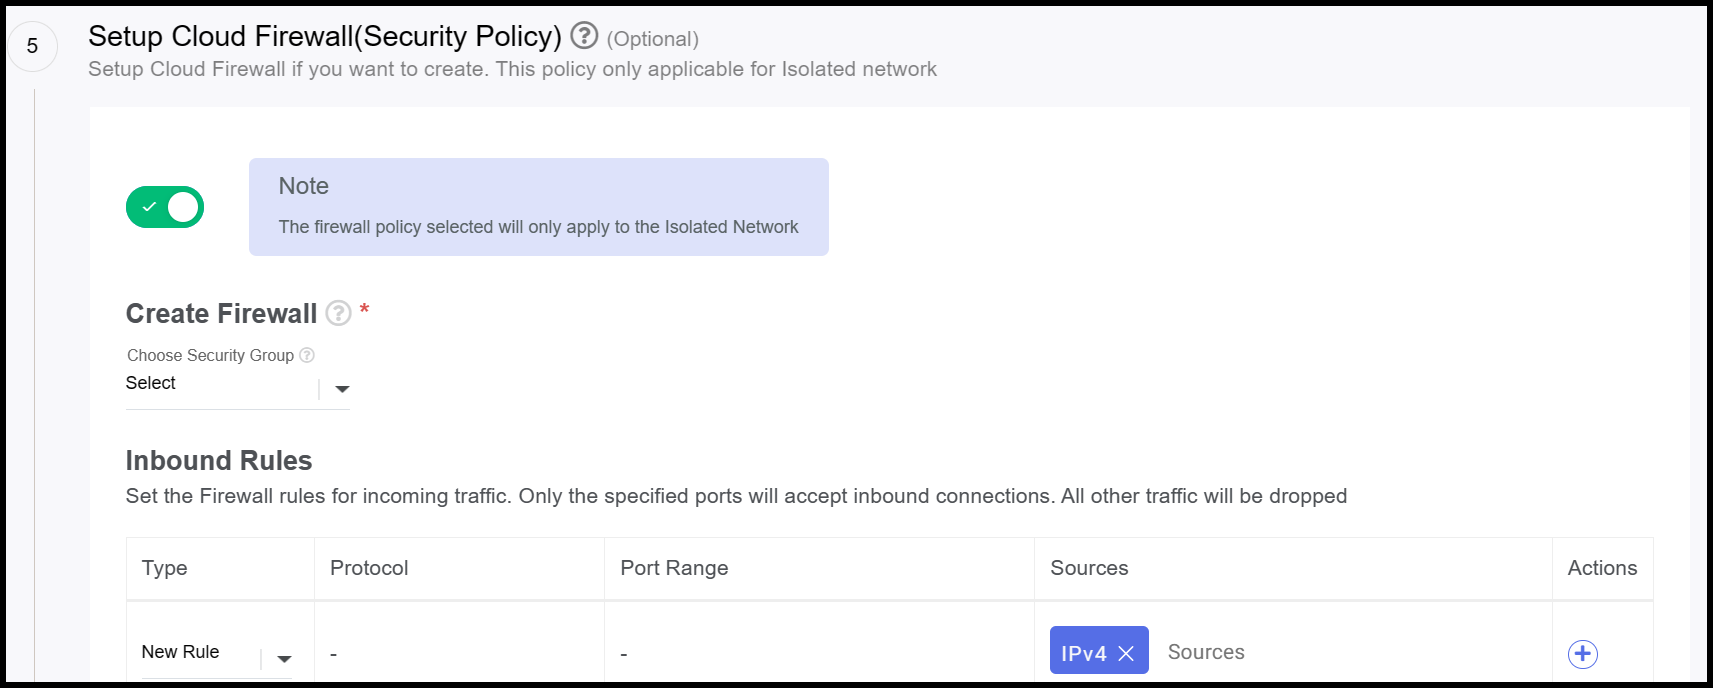
We can either ON or OFF the cloud firewall using the toggle button for your virtual instance.
Once the cloud firewall is in the ON state, we need to provide the list of required ports that need to be opened in the attached network for your instance.
Once the cloud firewall is in an OFF state, there will not be any restrictions, (i.e.) all the incoming & outgoing ports will be open for this instance.
SSH Key Configuration
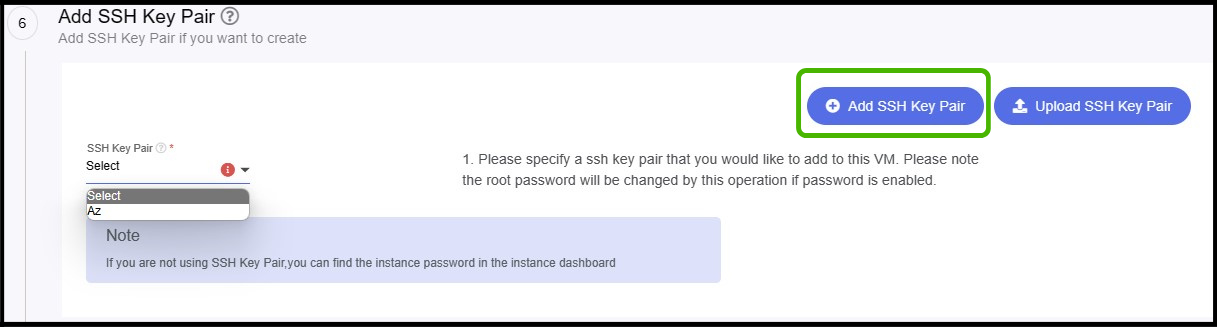
Note: SSH Key pair configuration will be available only for Linux templates.
You can select your existing SSH key pair from the drop-down list.
Also, you can able to create a new SSH key pair using Add SSH Key pair button.
You can also upload your existing SSH key pair to your StackBill CMP.
Instance Information
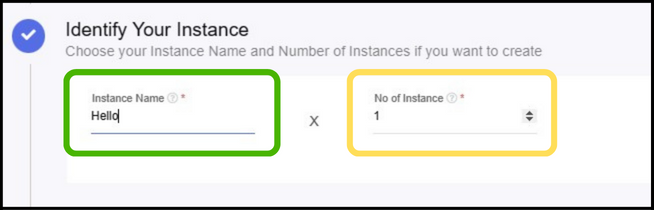
Finally, you need to provide a name for your instance. By default, Stackbill portal will assign a name to your instance and you can modified based on your requirements.
Also, you need to specify the number of instances that need to create.
Instance Cost Estimation

- You can also find the approximate price for your virtual instance by clicking on the Total Estimate link.
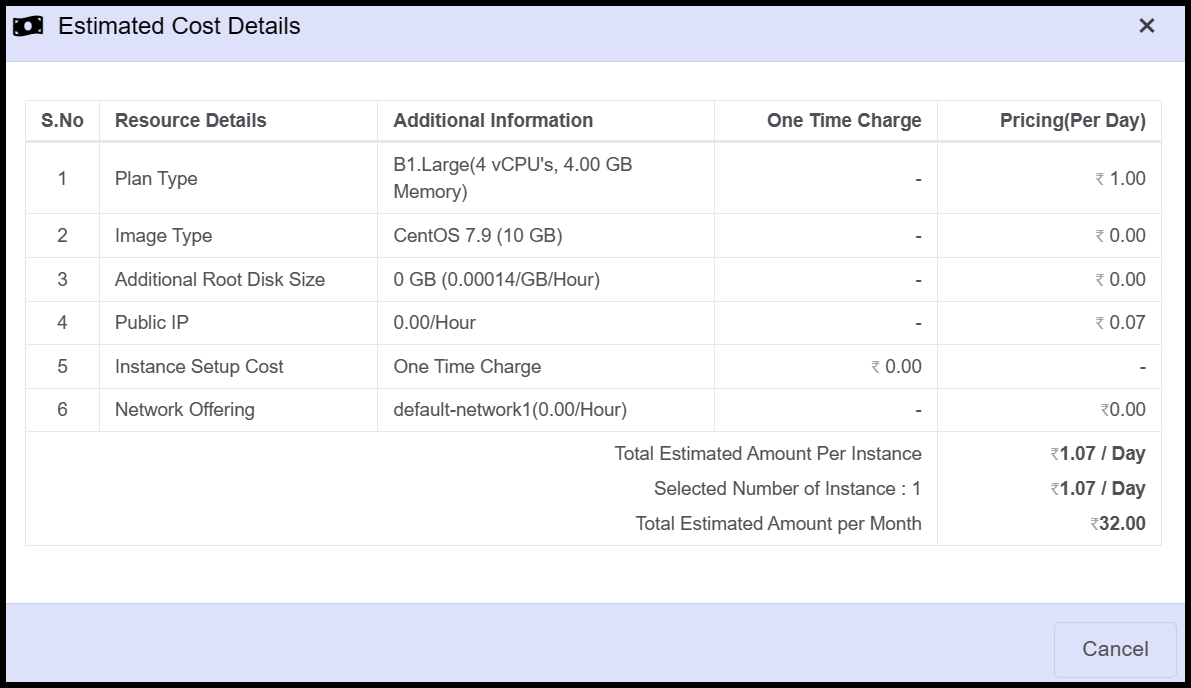
- Here, the user can view detailed information about the estimated cost.
Advanced Deploy in StackBill CMP
Overview
- Advance Deploy in StackBill CMP will be useful for the experienced users who have prior knowledge about cloud platform. Also, users who needs to customize virtual instance can use this option.

Note: Instance Marketplace will not available under advanced deploy option.
Platform selection
- Stackbill CMP offers you two types platforms. They are: Linux and Windows.
Distribution Types
StackBill Cloud Management Portal offers you various types of operating system flavors like Windows Server Editions, Linux, Debian, etc..,
There are 4 types of segregation available in the distribution selection. They are: All, OS only & My Images + ISO**
- All It will display all the OS flavours which are available in the StackBill Cloud Management Portal.
- OS Only - It will display only the OS related templates.
- My Images + ISO - It will display user created OS templates and also it will contains the default ISO images which StackBill will provide automatically.
Compute Plans
You need to select the list of plans which are available in the stackbill CMP. These plans will be configured by your StackBill administrator.
Select the appropriate plan for your instance.
Selecting a Network
By enabling "Create Instance with Public IP", you need to create a new network by click on Add network.
While creating a new network, you need to provide Name, Security group and network offering. Then click on create button.
Configuring Cloud Firewall
We can either ON or OFF the cloud firewall using the toggle button for your virtual instance.
Once the cloud firewall is in the ON state, we need to provide the list of required ports that need to be opened in the attached network for your instance.
Once the cloud firewall is in an OFF state, there will not be any restrictions, (i.e.) all the incoming & outgoing ports will be open for this instance.
Adding Block Storage

- Stackbill CMP will provide you with various types of plans to add additional storage for your virtual instance. Select the required size based on your requirement.
SSH Key Configuration
Note: SSH Key pair configuration will be available only for Linux templates.
You can select your existing SSH key pair from the drop-down list.
Also, you can able to create a new SSH key pair using Add SSH Key pair button.
You can also upload your existing SSH key pair to your Stackbill CMP.
Instance Information
- Finally, you need to provide a name for your instance. By default, the Stackbill Cloud Management Portal will assign a name to your instance and you can be modified based on your requirements.
- Also, you need to specify the number of instances that need to create.
Instance Cost Estimation
- You can also find the approximate price for your virtual instance by click on the Total Estimate link.
- Here, the user can view detailed information about the estimated cost.
Accessing your windows virtual instance from your windows Laptop or Desktop
- Let assume that you have already created a windows virtual machine under your account.
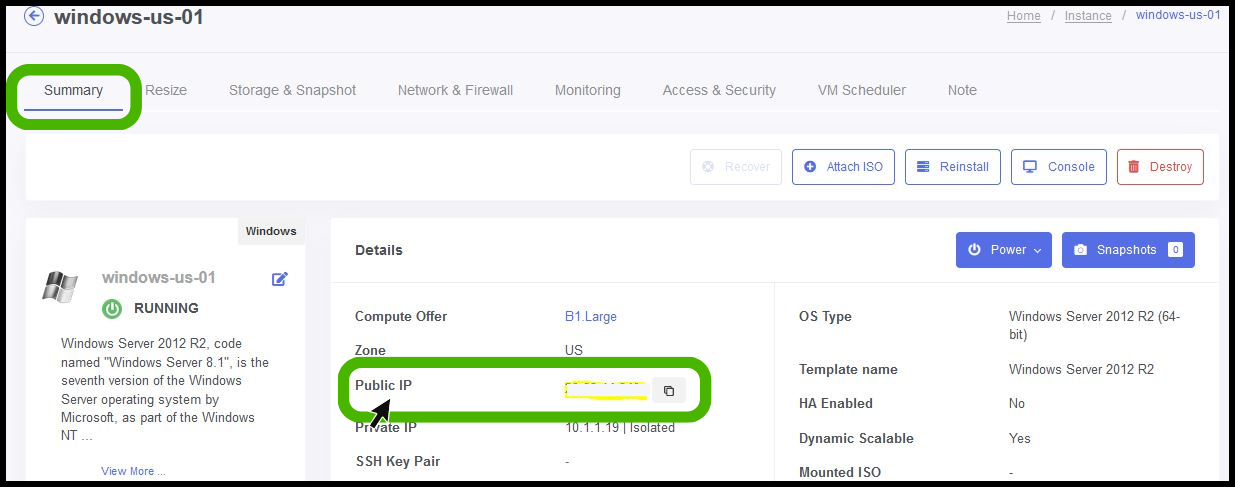
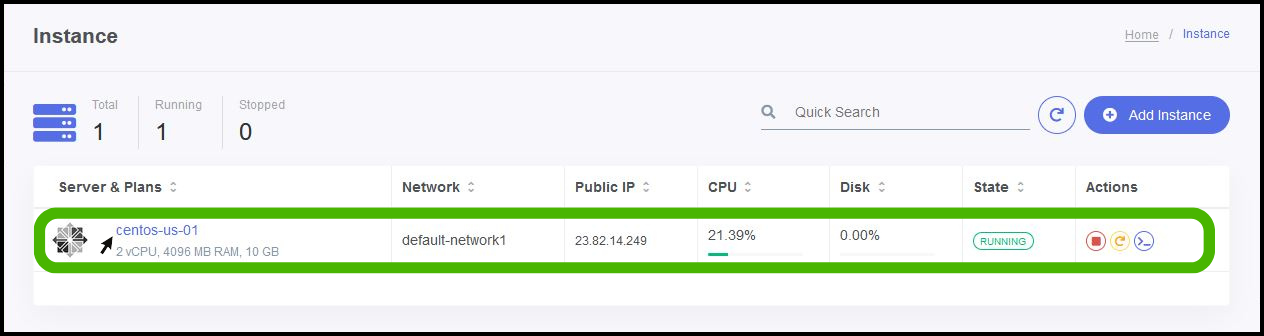
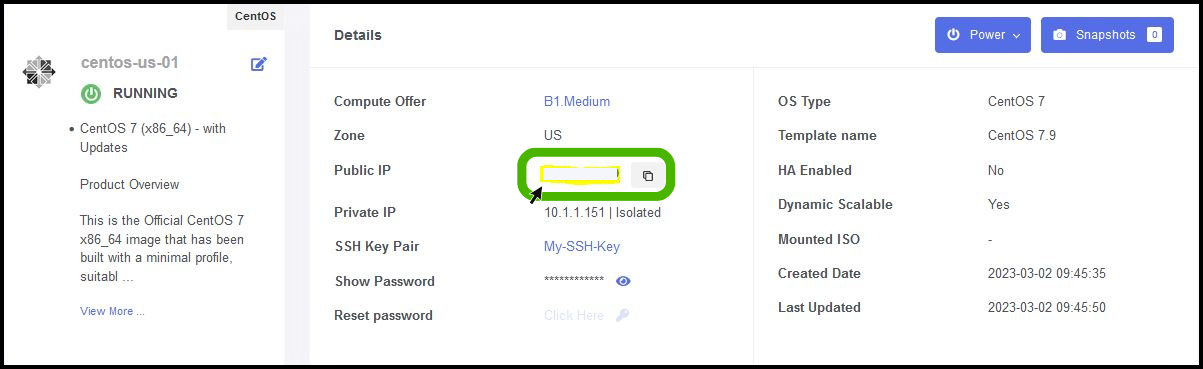
- Click on the virtual machine and navigate to its details and copy the Public IP.
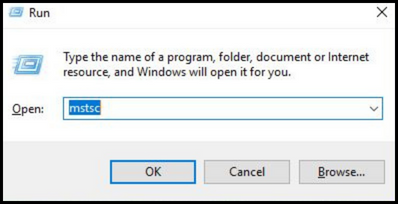
- Open the run prompt from your laptop/desktop (Pressing ctrl key+R) and type mstsc command.
- Paste the Public IP which was copied from the instance details page in the RDP window.
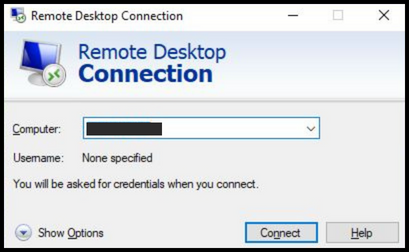
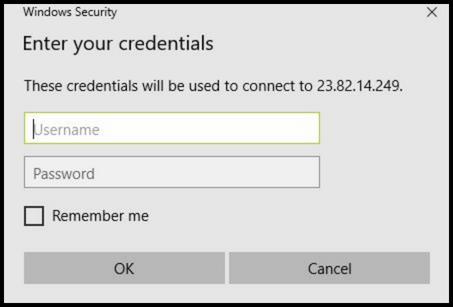
- Now it will prompts for username & Password, you can get that credentials from the your VM details page.
- Now you will able to login into your windows virtual machine from your Laptop or Desktop.
Remote Desktop to Your Instance From a Linux Computer using Rdesktop
- Once the user open linux screen at the top left corner there is a option called Application
- Click on it to view the drop down.
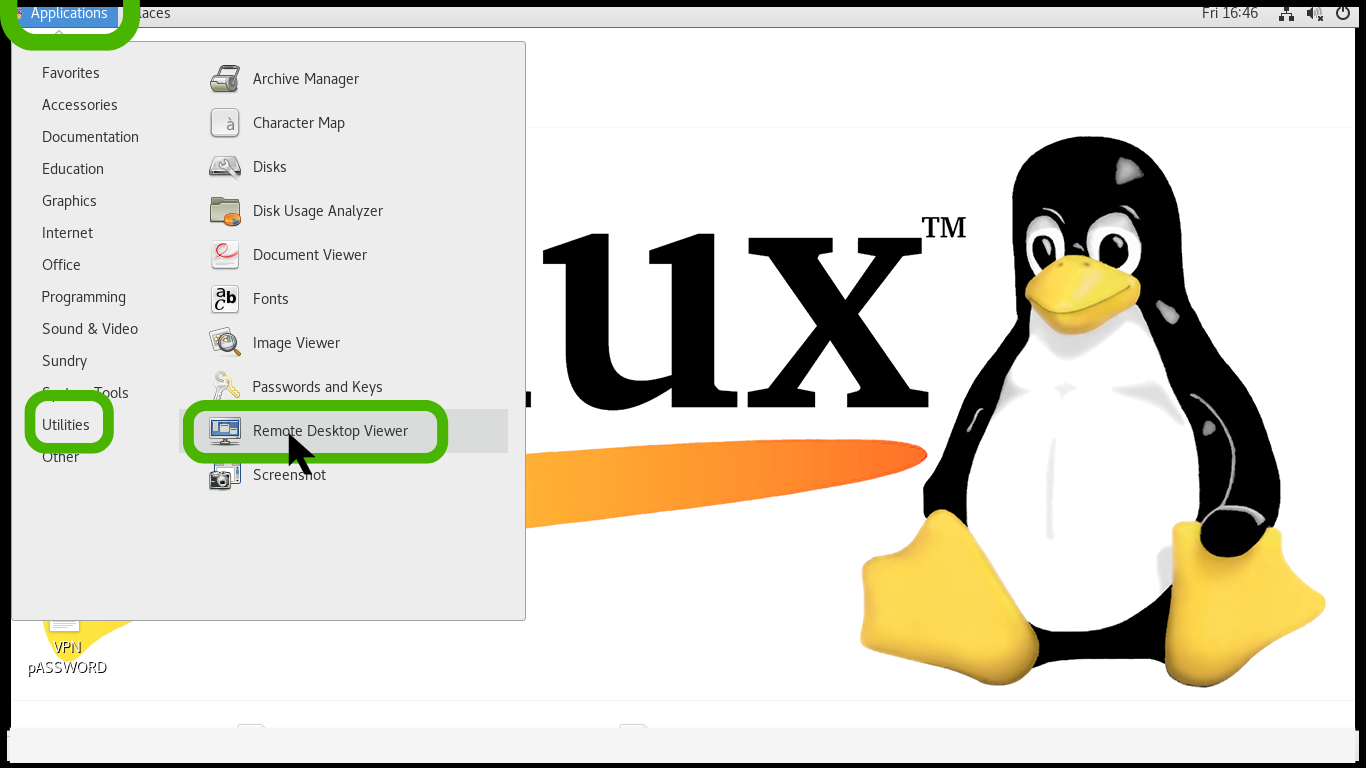
- From the drop down, Click on Utilities.
- From the utilities, Click on Remote Desk Viewer
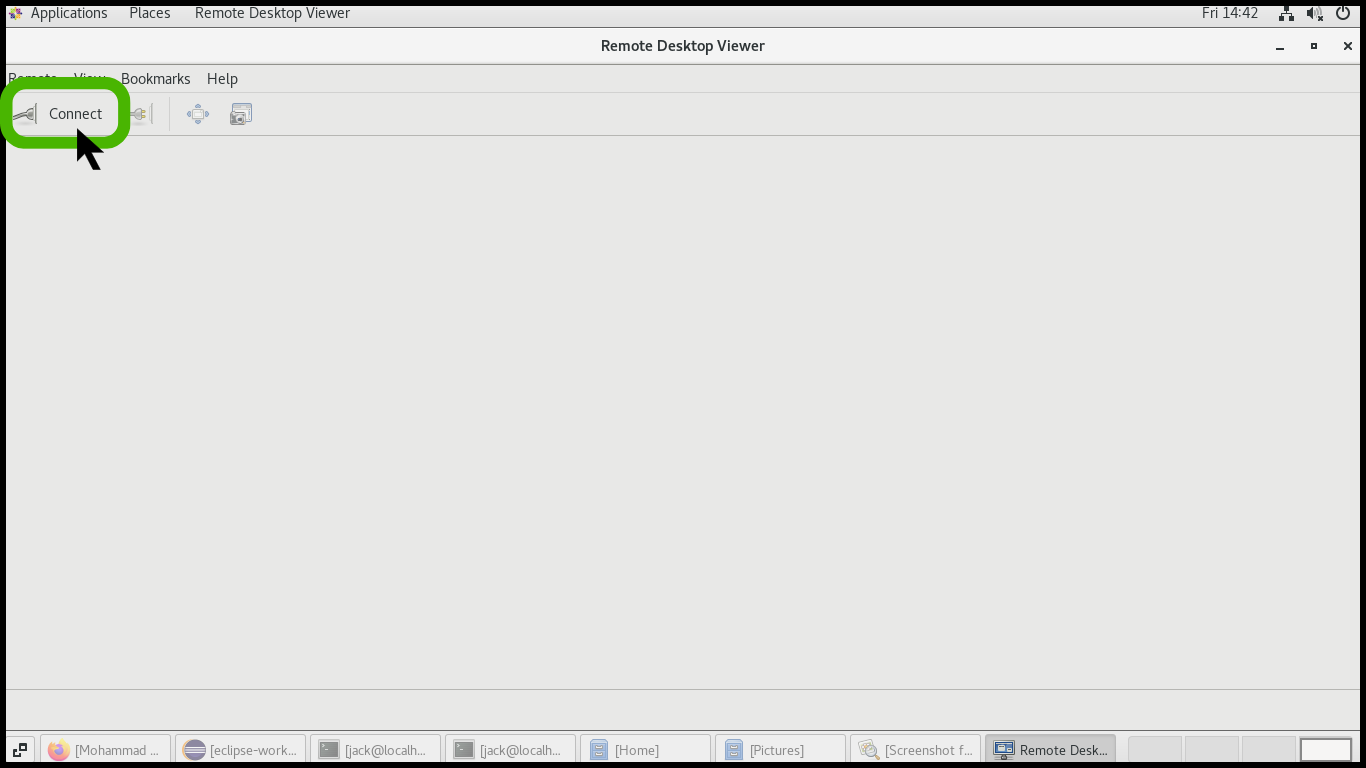
- Remote desk viewer screen appears.
- At the top left corner there is a option called Connect, Click on it.
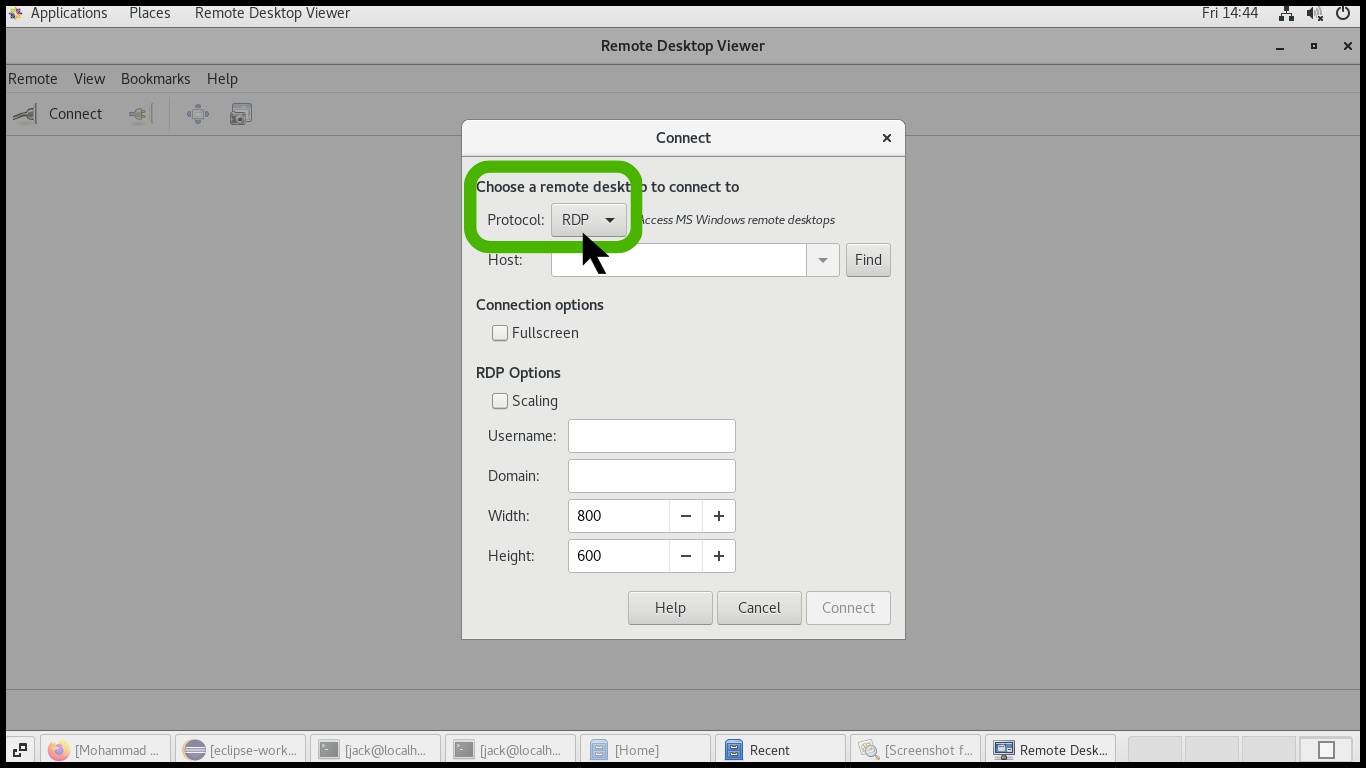
- Change the Protocol into RDP to access the Windows VM in linux machine.
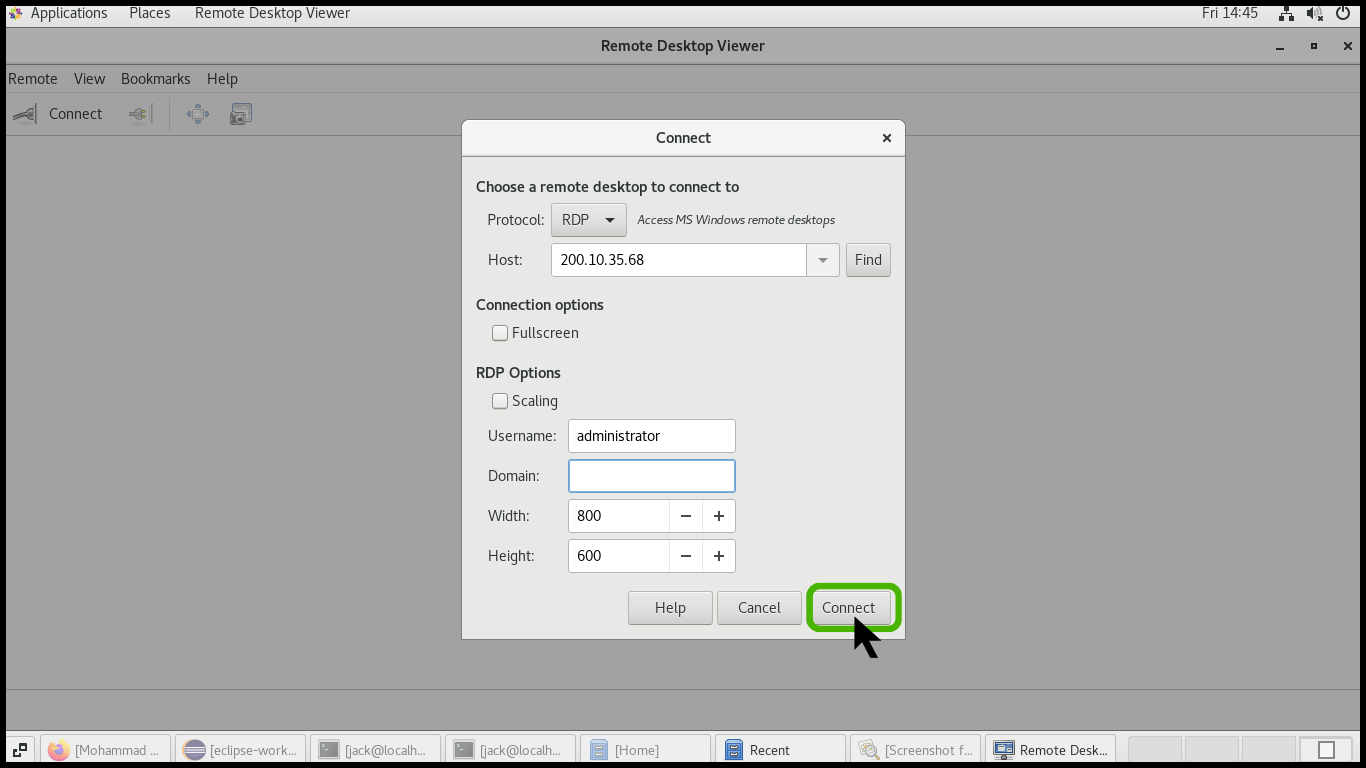
- Enter the Public Ip in the Host option.
- Enter the username and password.
- Finally click on the Connect button.
Accessing your Linux virtual instance from your windows Laptop or Desktop
- Let assume that you have already created a Linux virtual instance under your account.
- You can find the server Public IP from the instance details page.
- You can use the Putty tool to access the Linux virtual instance from windows environment.
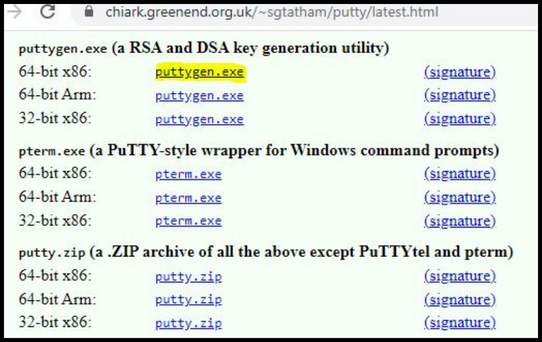
Note: PuTTY is a free and open-source terminal emulator which used to connect linux machines. You can download the Putty from this URL https://www.chiark.greenend.org.uk/~sgtatham/putty/latest.html
- Once you download the Putty tool double click to open it.

- Paste your instance IP in the Hostname textbox and provide port number under port section. Then click on open button.
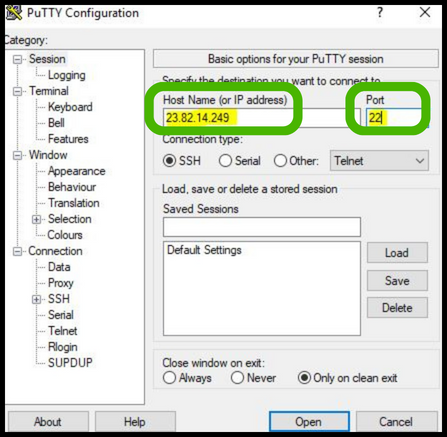
- Provide the username and password for your instance and press Enter.
Note: By default, CentOS username will be root and Ubuntu OS username will be ubuntu
- Now you will able to login into your Linux instance.
Accessing your Linux virtual instance using SSH Key from your windows Laptop/Desktop
Let assume that you have already created a Linux virtual instance with SSH key under your account.
You can find your SSH key name from the instance details page.
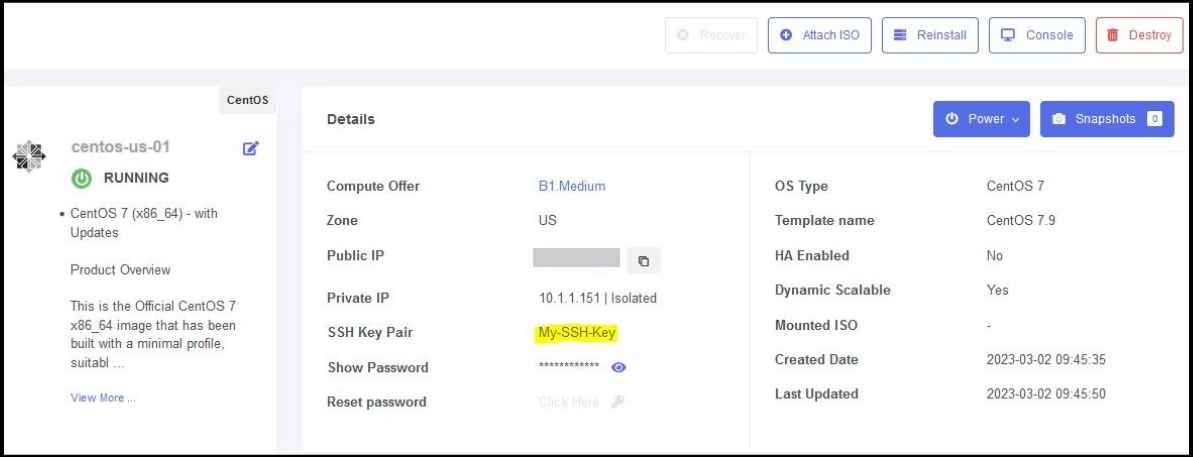
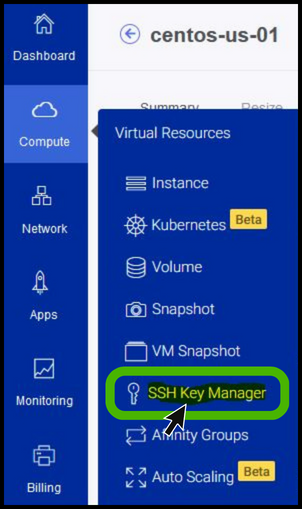
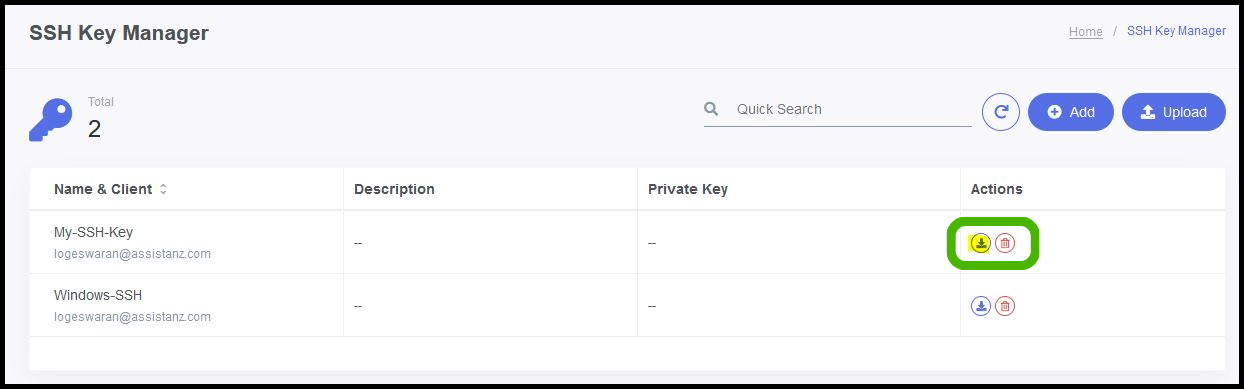
- The SSH key which was attached to your instance can be download to your Laptop / Desktop. For that, Go to Compute -> SSH Key Manager.
- Click the download button to download your corresponding SSH key pair.
- By default, you will not able to access the linux instance using SSH key with PEM extension key pair.

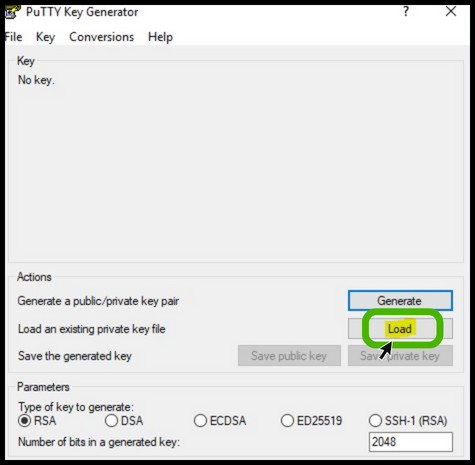
- You need to convert your SSH key pair to PPK extension using PuttyGen tool. You can download this tool from the URL https://www.chiark.greenend.org.uk/~sgtatham/putty/latest.html
- Once you dowload the puttygen tool, double click to open it. Then click on the Load button.
- Change the File extensions to All Files, Select your SSH key pair file and click on open button.
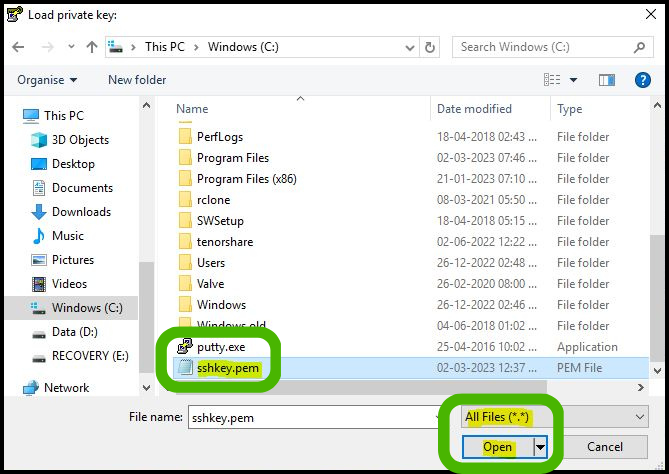
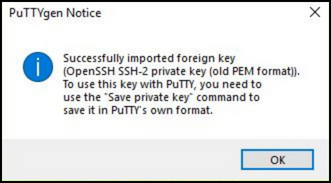
- You will receive a popup screen that SSH key pair has been loaded successfully.
- Now click on the Save private key option.
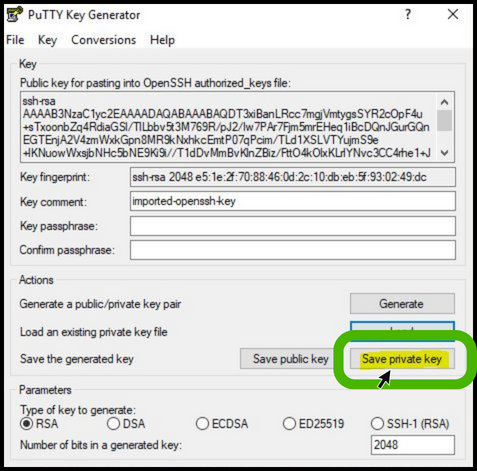
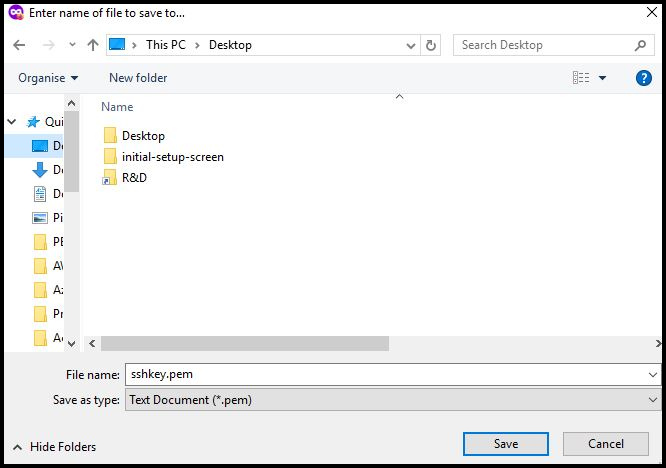
- It will prompt you to continue to save the private key without passphrase. Click Yes to continue.

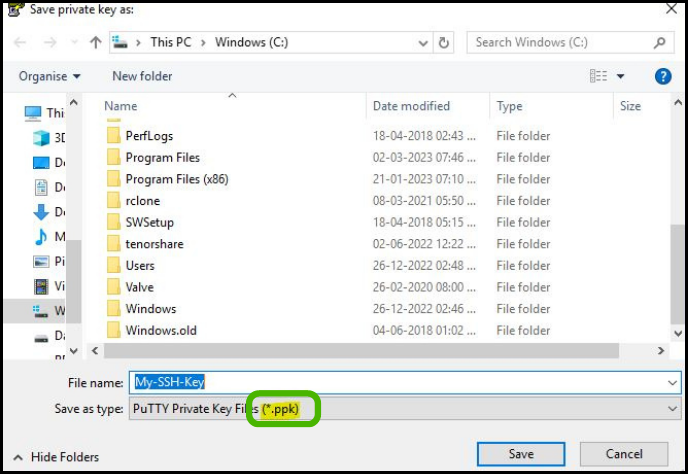
- Now, provide a name for the key and make sure that this Key is save in .PPK format.
Accessing the VM using SSH Key
- You can use the Putty tool to access the Linux virtual instance from windows environment.
Note: PuTTY is a free and open-source terminal emulator which used to connect linux machines. You can download the Putty from this URL https://www.chiark.greenend.org.uk/~sgtatham/putty/latest.html
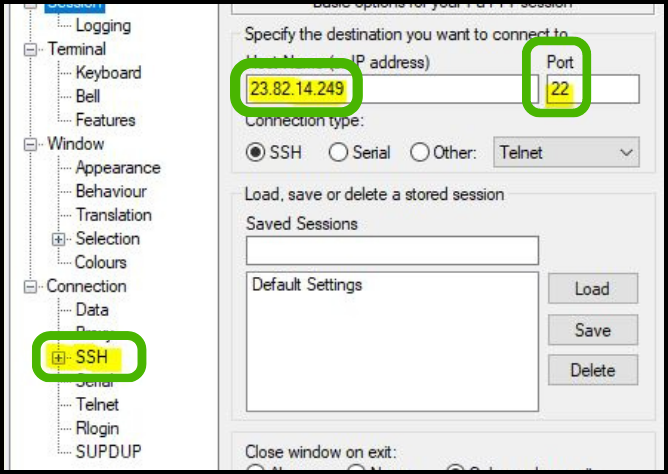
- Paste your instance IP in the Hostname textbox and provide the port number under the port section. Then expand SSH Option from the Putty tool.
- Then expand Auth option and select credentials.
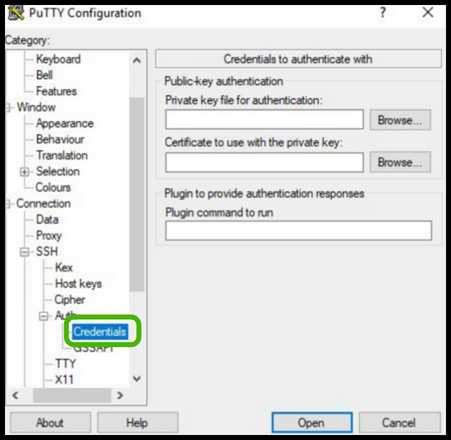
- Click on browse button under Private key file for authentication section.

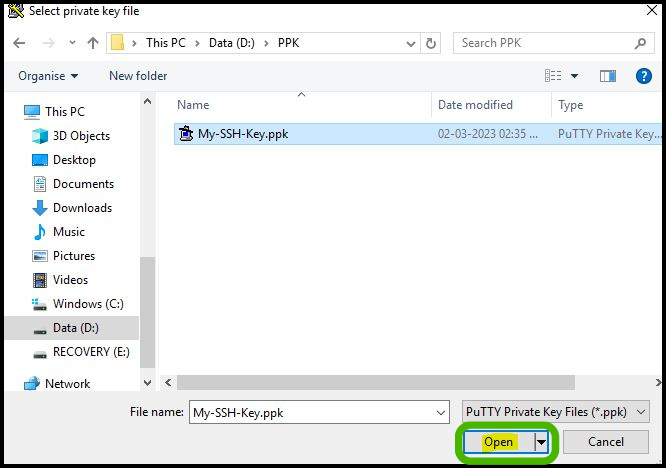
- Select your converted PPK file and click on Open button.
- Now click on Open button.
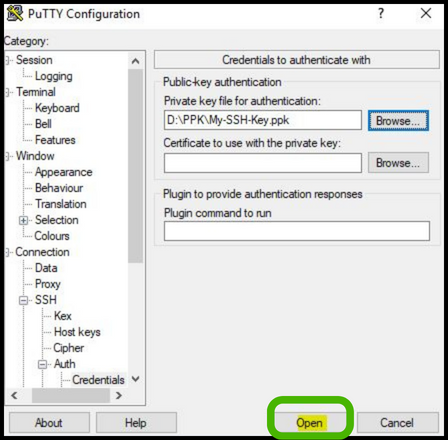
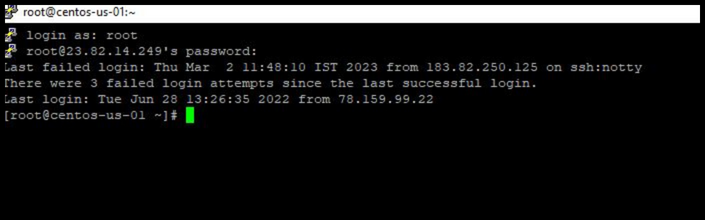
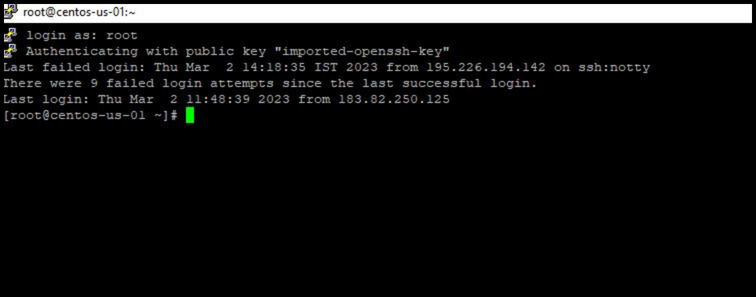
- Provide the username as root and press Enter. You can able to see that you virtual instance will use the converted PPK to login into your machine.
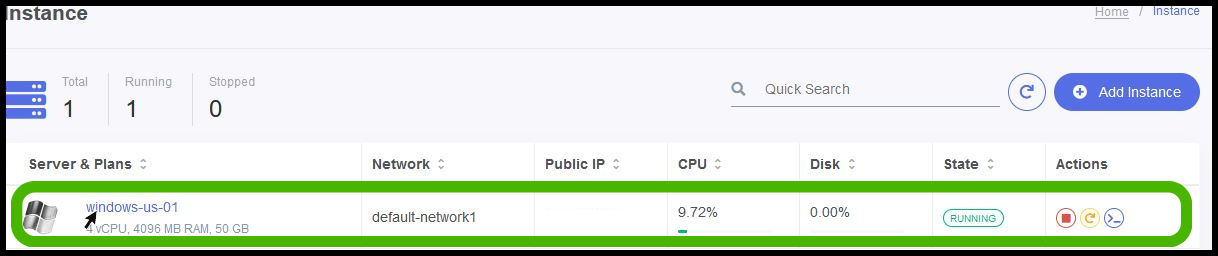
Instance Details
Summary Overview in StackBill CMP
Stackbill Cloud Management Portal has designed an exclusive user friendly instance dashboard especially for novice users. This dashboard will provide you various information about instance such as Instance Zone, Instance status, Instance IP's, SSH keypair, and many more.
Also, stackbill CMP provide you the basic virtual instance monitoring information such as CPU, Memory, Disk & Network. If you need detailed information about the services, then user need to enable Advanced monitoring for your virutal instance.
Stackbill will continue to enhance the UI/UX experience so that the user can access the functionalities with greater clarity and ease.
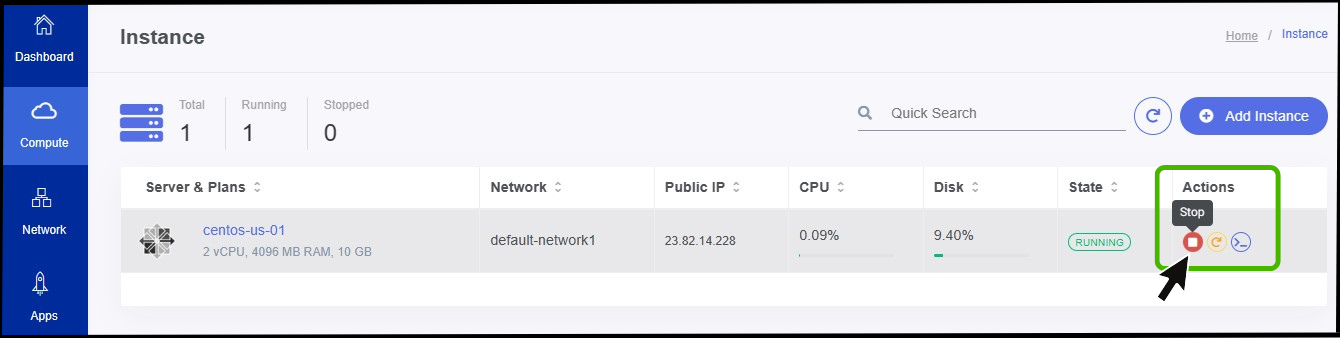
Start, Stop & Restart Virtual Instance
- Stackbill Cloud Management Portal has provide you handy functionality to start, stop and restart your virtual instance without any hassles.
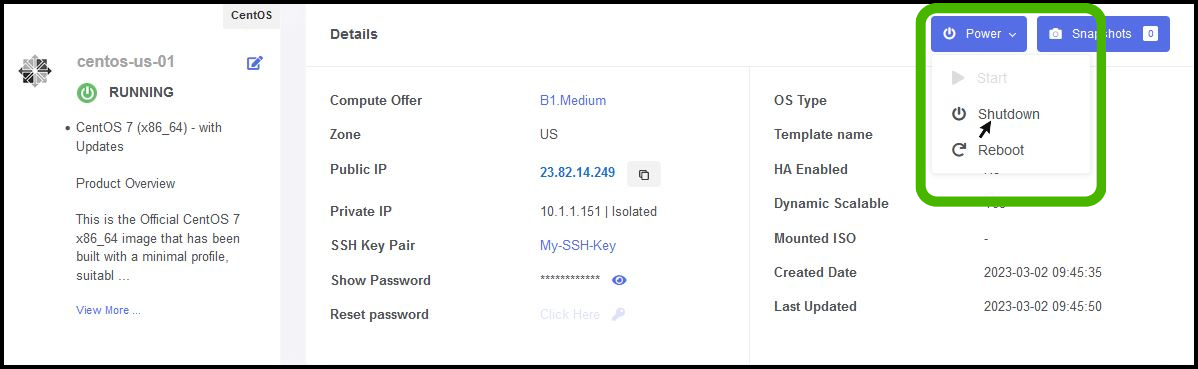
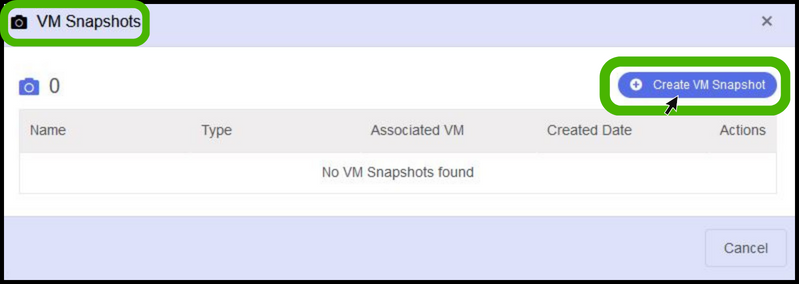
VM snapshots
We can able to take VM snapshots from the instance details page. Detailed information about VM snapshots are under snapshots section.
Recover VM

- All the virtual machines which are created in stackbill will have four stages. They are:
Creating, Running, Stop, Delete & Expunge
Creating - When you create a new instance it will be in creating state.
Running - Once your VM has been successfully created, it will be in Running state.
Stop - When the VM is stopped state, it will move to stop state.
Delete - When you delete a VM without Expunge option has been enabled it will be moved to delete state. Later you can recover the VM using the Recover VM option.
Expunge - The VM will transition to this level once it has been totally removed from the infrastructure.
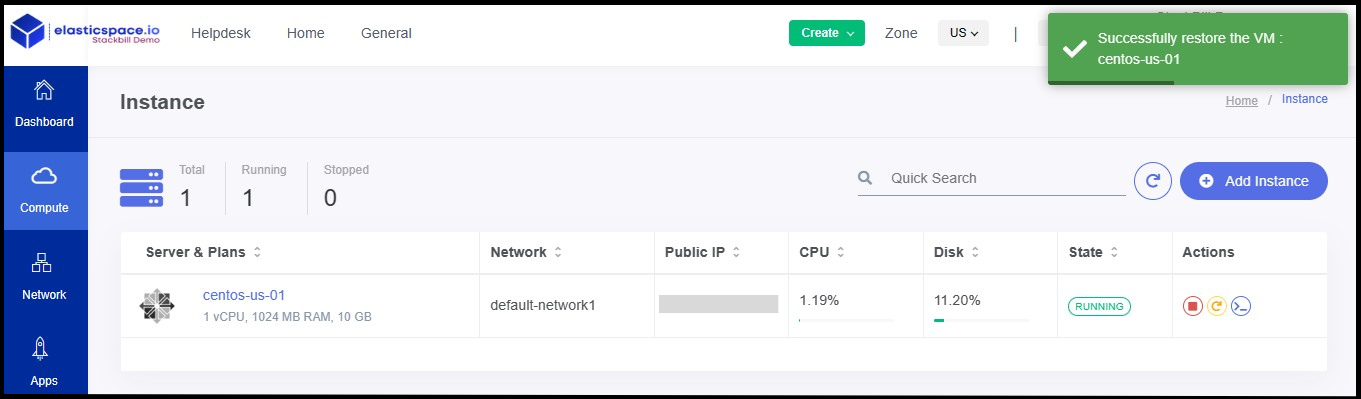
Recover VM option only available if the VM status is in Destroyed state.
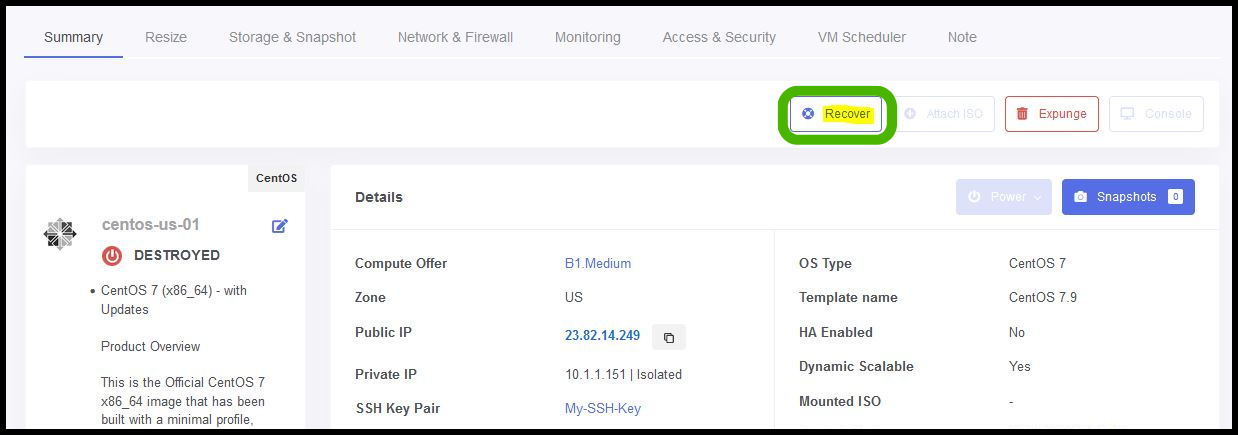
To recover a VM from the destroy state, click on Recover VM option.
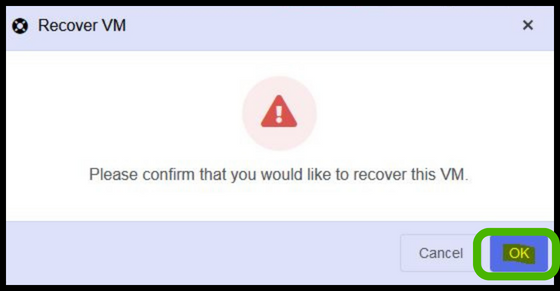
Click OK to recover the VM from the destroyed state.

- After few seconds, the VM state will be changed from destroyed to stopped state.
- Now your VM has been successfully recovered.
Attach ISO
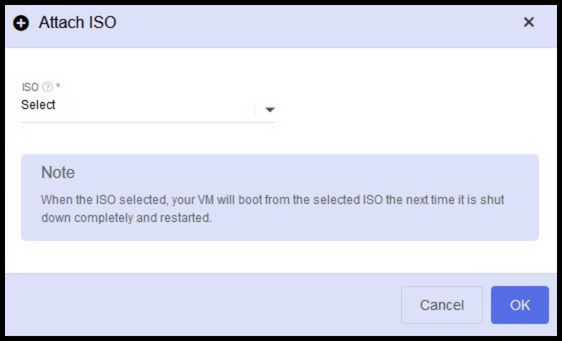
- If you need to reinstall your virtual machine using ISO, then you can use this option.
- Once the ISO has been attached successfully, When you reboot the machine, it will automatically boot from the selected ISO.
Note: Make sure that you have backup your virtual machine data before proceeding this option.
Reinstall VM in StackBill CMP
Stackbill's instance can be reinstalled by following the procedures below.
- Step 1 - Click on the Compute option from the side menu of the portal and select Instance.
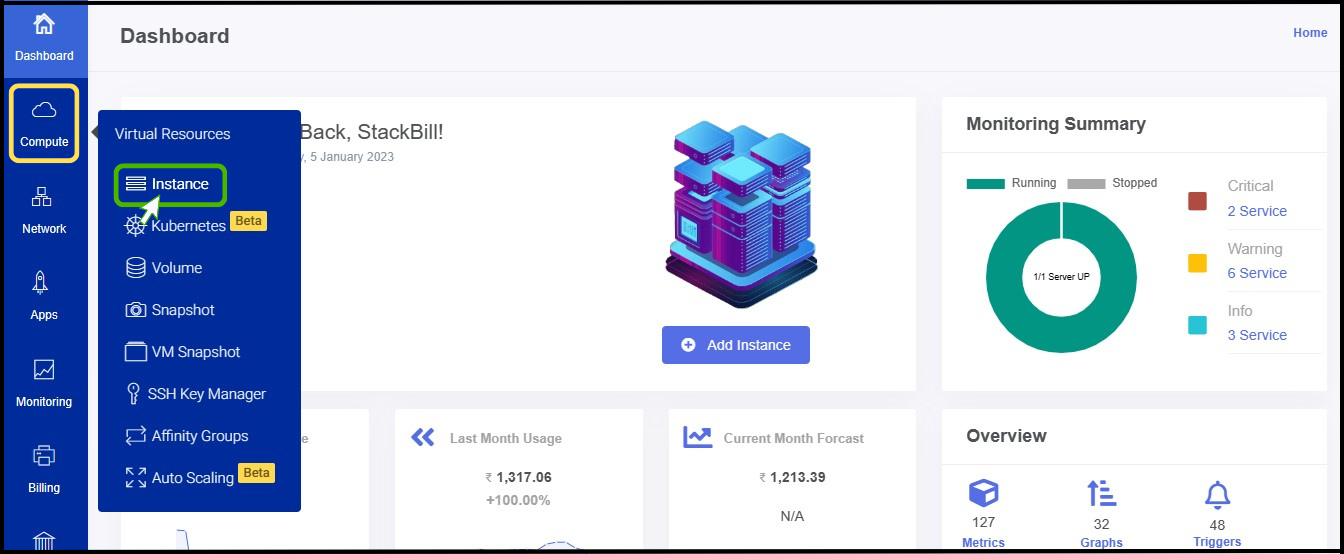
- Step 2 - Click on the Instance so that you can view a summary page of the particular instance.

- Step3 - There you can view the Reinstall icon at right side of the panel, Click on it.
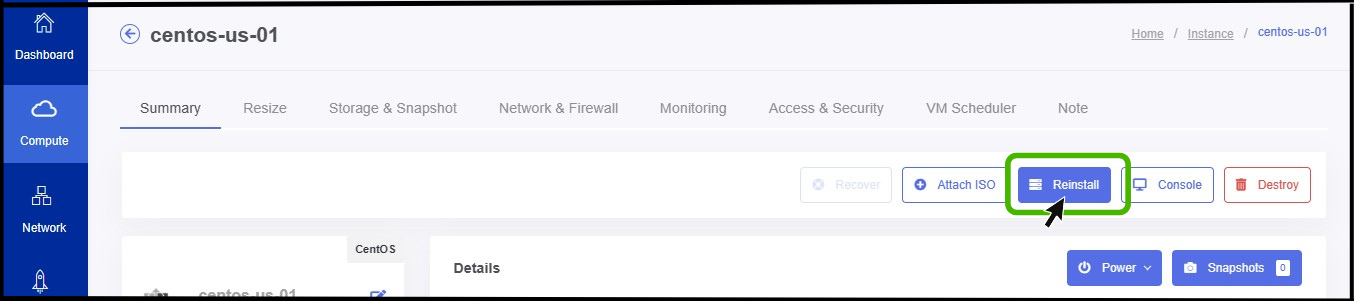
- Now the Reinstall option appears on the screen.
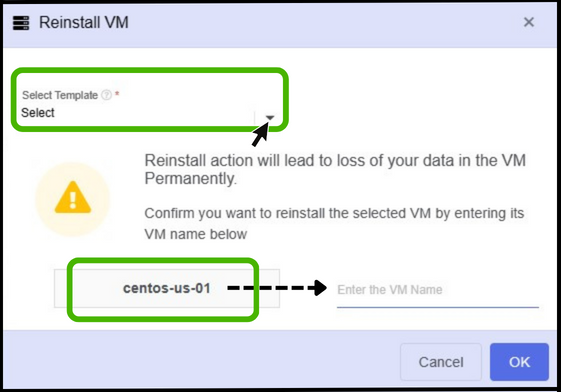
Note: Make sure that you have backup your virtual machine data before proceeding this option. This option will lead you to data loss.
- Select Instance - In this step, the user must select the OS image that will be created after the reinstallation is finished.
- Enter the VM name - Here the user needs to enter the name of the instance to install.
- Finally click OK button.
- Now the instance has been reinstalled successfully.
Accessing Console in Stackbill CMP
Using Accessing Console you can able to access the instance through webbrowser.
Below is the following steps for Accessing console for the instance.
- Step 1 - Click on the Compute option from the side menu of the portal and select Instance.
- Step 2 - Click on the Instance so that you can view a summary page of the particular instance.
- Step3 - There you can view the Console icon at right side of the panel, Click on it.
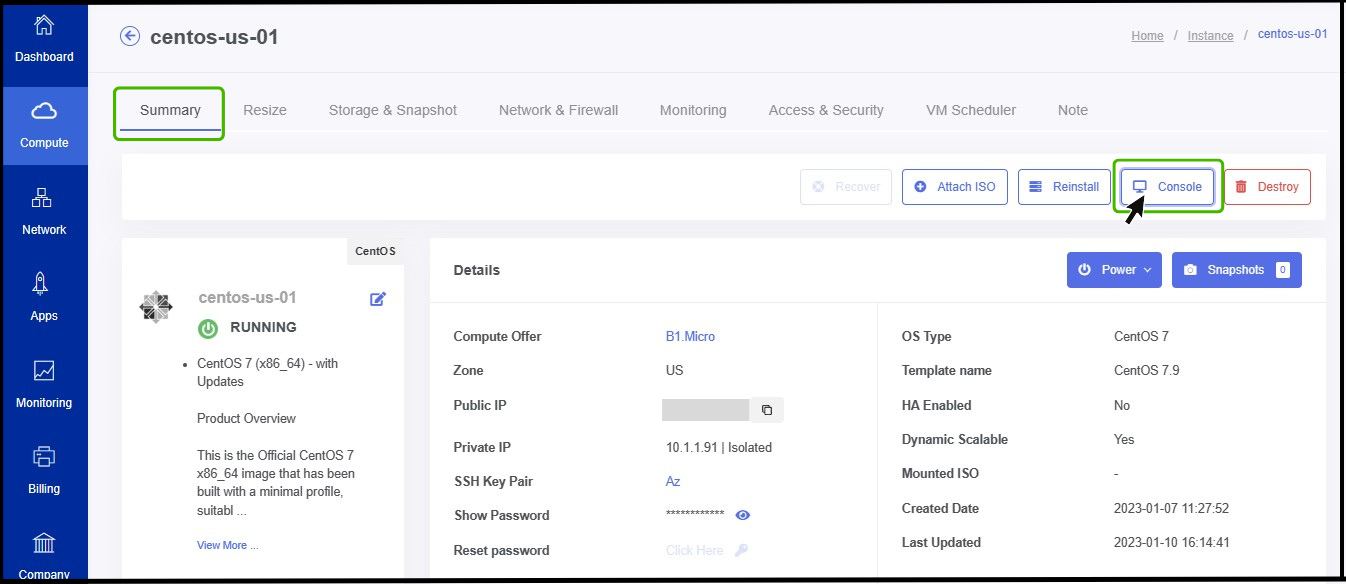
- Once you click on the Console icon it will opens a new window.
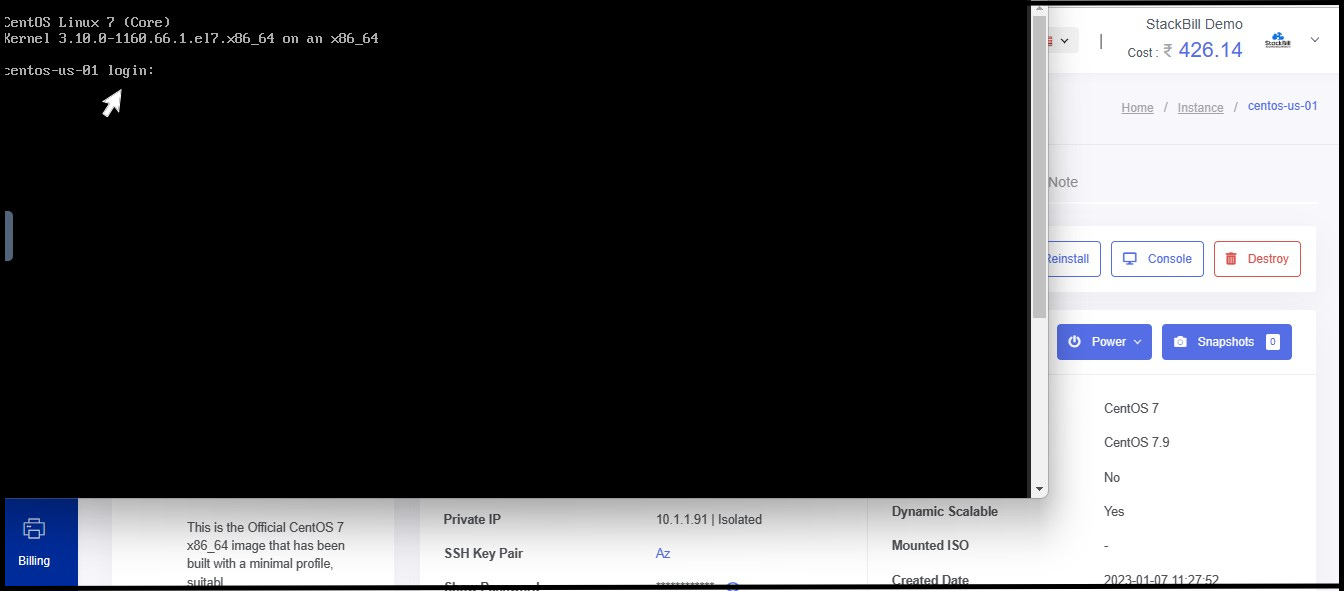
- Here, the user enters their instance username and password and clicks the Enter key.
- Now the instance has been logged in.
Destroy VM in StackBill CMP
To delete an instance of Stackbill CMP, follow the steps below.
Step 1 - Click on the Compute option from the side menu of the portal and select Instance.
- Now the instance page appears on the screen.
- Make sure the instance is in the stopped stage before selecting it.
- Click on the Instance so that you can view a summary page of the particular instance.
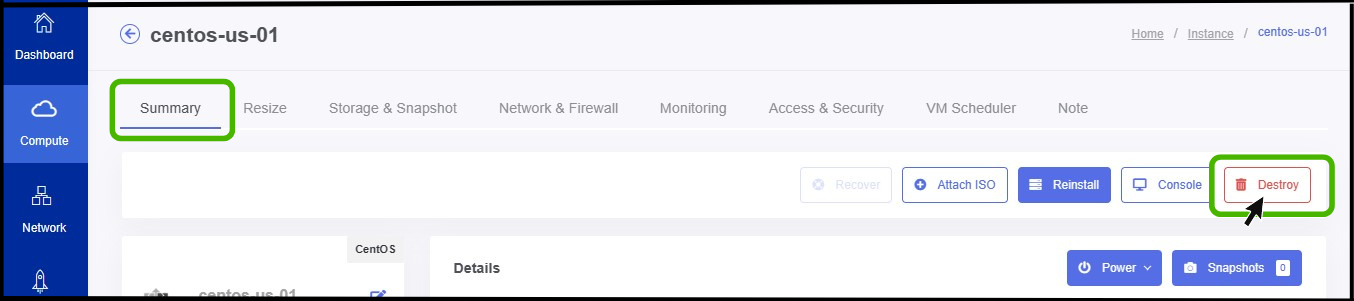
- Click on the Summary option from the menu.
- A delete option can be found on the panel's right side. Just click it.
- Now the Destroy VM option appears on the screen.
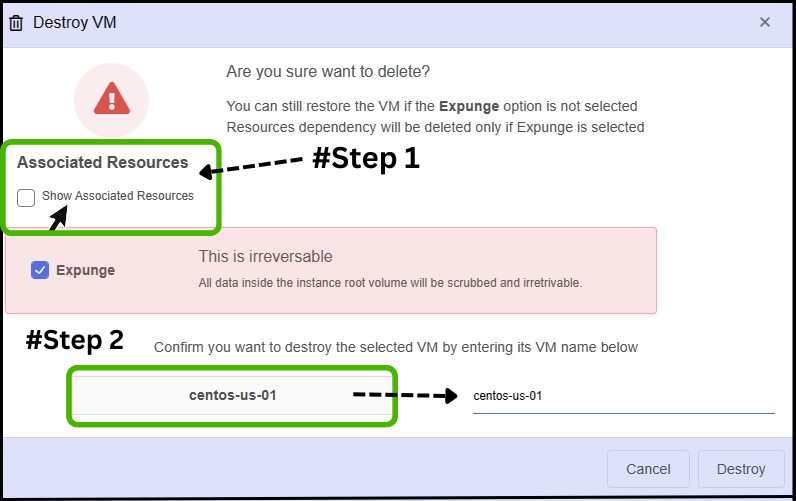
Step 1 - On the first step the user wants expunge the all associated resources.
Step2 - On the second step the user wants to confirm to delete the instance by entering the name of the VM.
- Finally click on Destroy button.
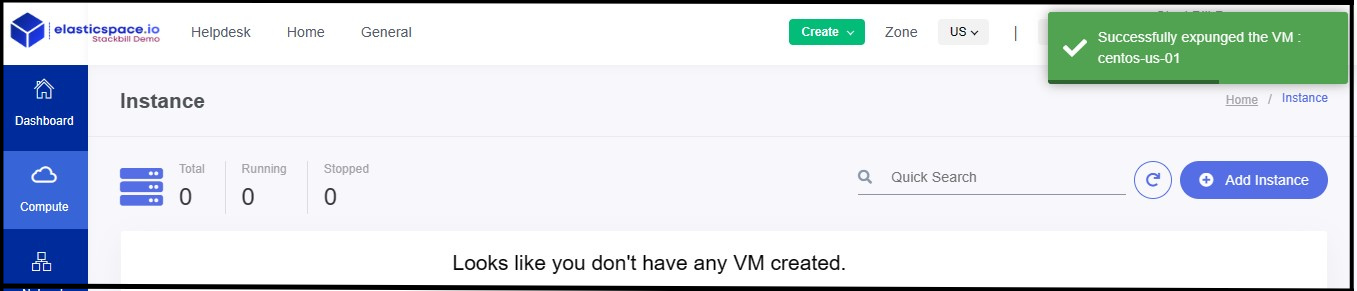
- Now the instance has been deleted successfully.
Instance Resize
Stackbill Cloud Management Portal offers you flexible way to migrate your instance plan from one plan to another using simple GUI Interface.
- Resizing an instance in StackBill CMP is simple as following these steps
Before resizing the instance, ensure that the instance has been stopped.
- Click on the instance.
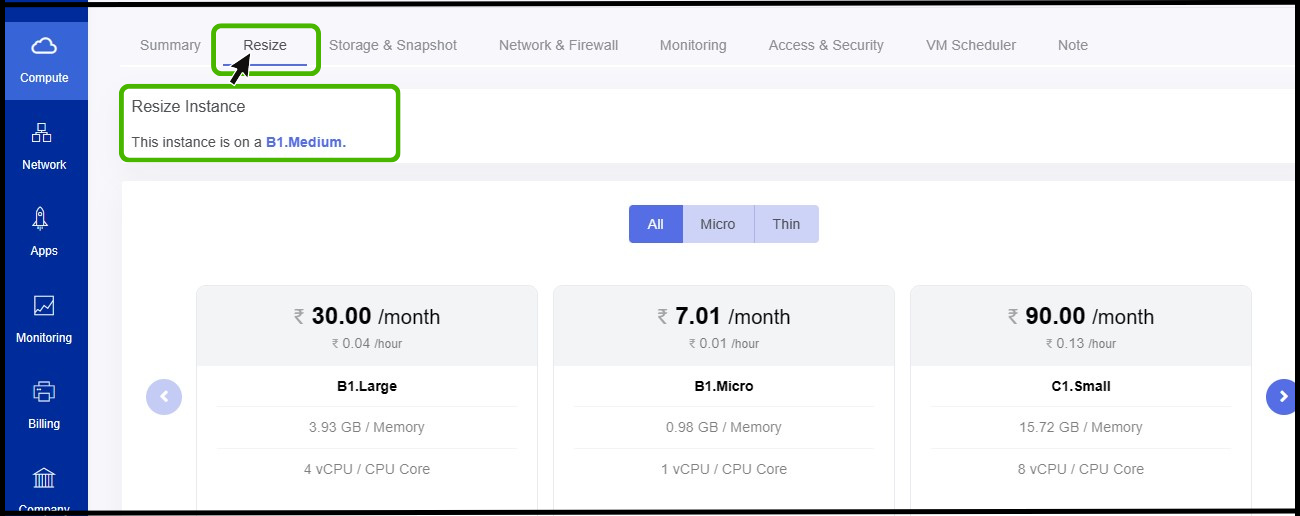
- Click on the resize option to resize the instance.
- By selecting the option, you can see the size of the current instance.
- Depending on your needs, you can upgrade or downgrade the size of the instance from the following plans.
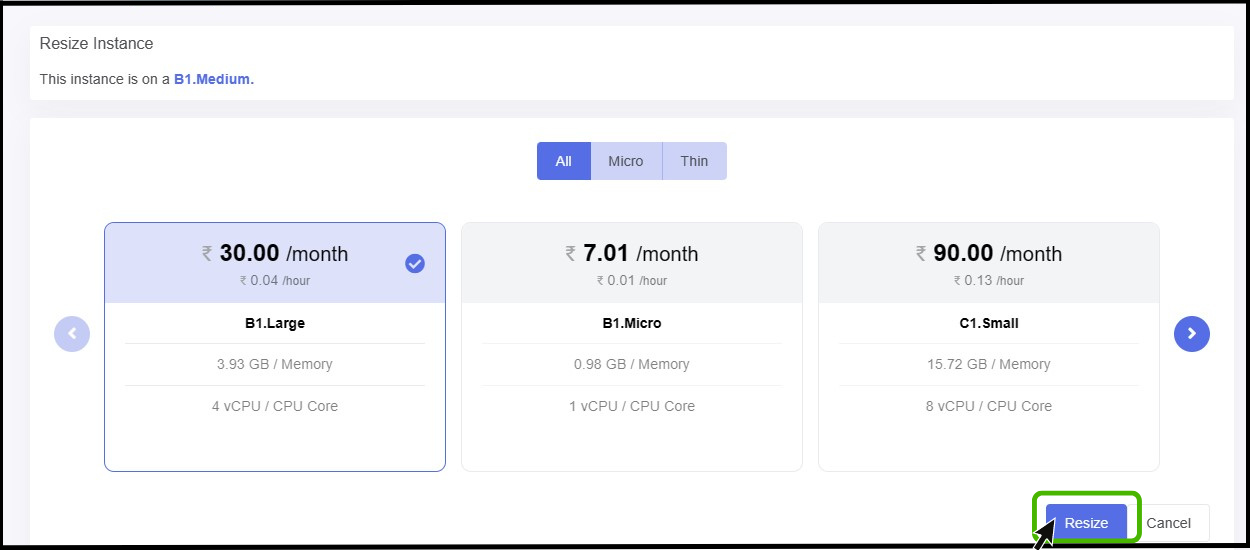
- Click the RESIZE button after selecting the plan..
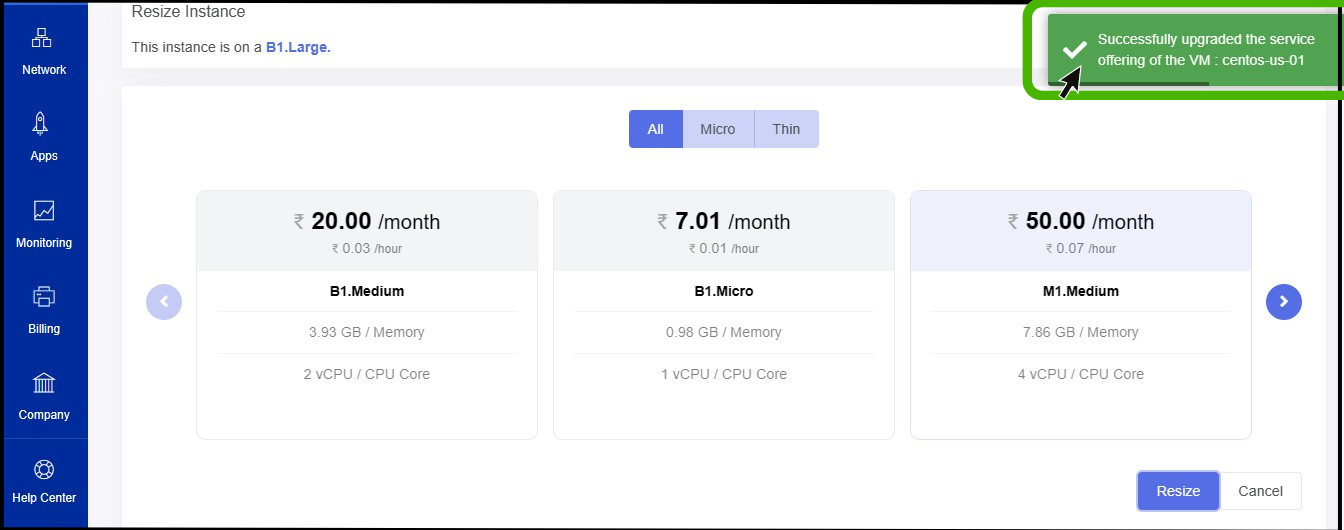
- Now the VM has been resized successfully..
Savings Plans in StackBill CMP
Savings Plans in StackBill Cloud Management Portal are a flexible pricing model that offer low prices on resource usage, in exchange for a commitment to a consistent amount of usage (measured in ₹ /hour) for long term.
- Before enabling a saving plan ensure the instance is on stopped stage.
The user can enable saving plans in StackBill CMP in two ways they are,
- Enable the plan directly by clicking on the instance, which may automatically generate the instance information process.
- Second method, Enabling the saving plan using the savings plan option from the side menu option.
Enable the saving plan directly by clicking on the instance
- Method 1
- Click on the instance.
- Select Resize from the option.
- When you scroll down on the panel, you will see an option called Purchase Saving plan.
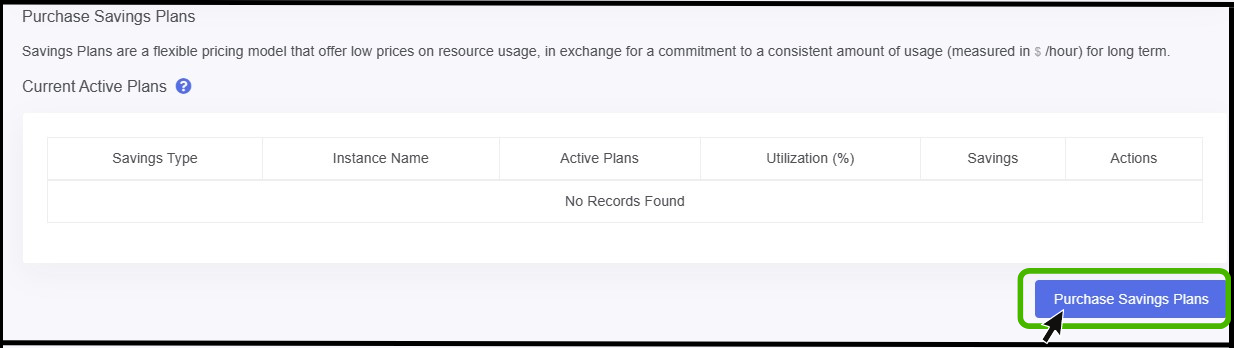
- On clicking the Purchase Saving Plan button, the page for Purchase Saving Plan is appear on the screen.
- Here you can select the offering as per the requirement.
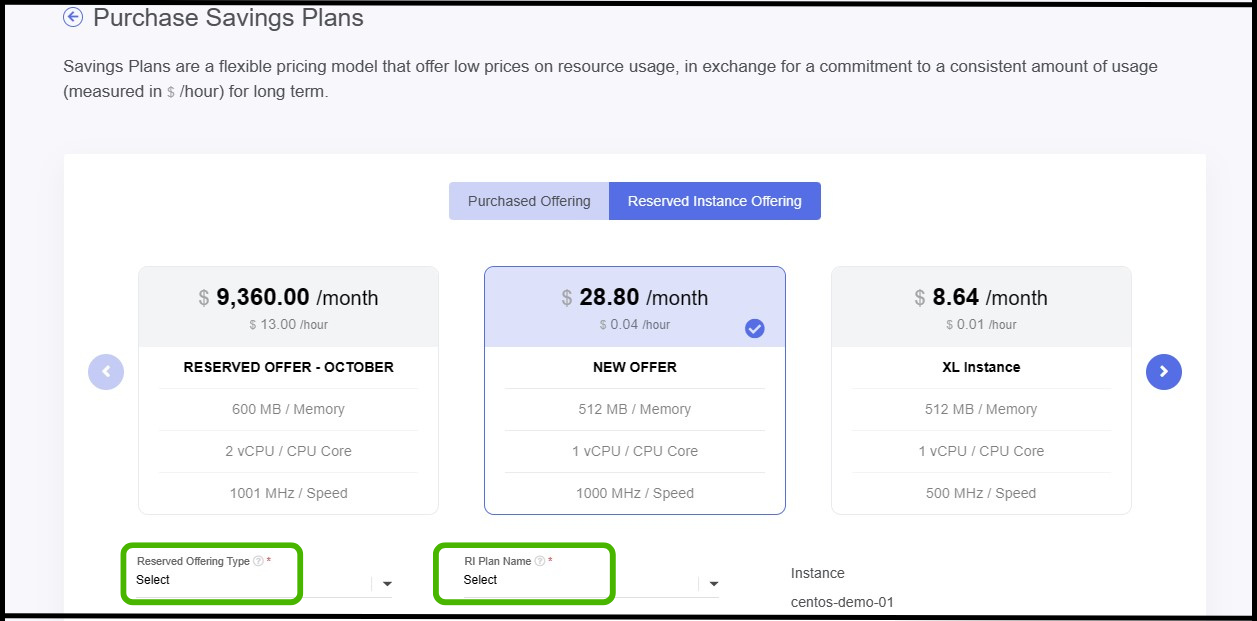
Reserved offering type - There are two types of reserved offering they are STANDARD and CONVERTABLE.
STANDARD OFFERING - Users who select the standard offering cannot upgrade or downgrade the offering; they can only maintain the same offering they configured initially.
CONVERTABLE OFFERING - If users select the convertible offering, they can upgrade or downgrade the offering at any time.
RI Plan name
- Select the RI plan (i.e. yearly or monthly coverage).
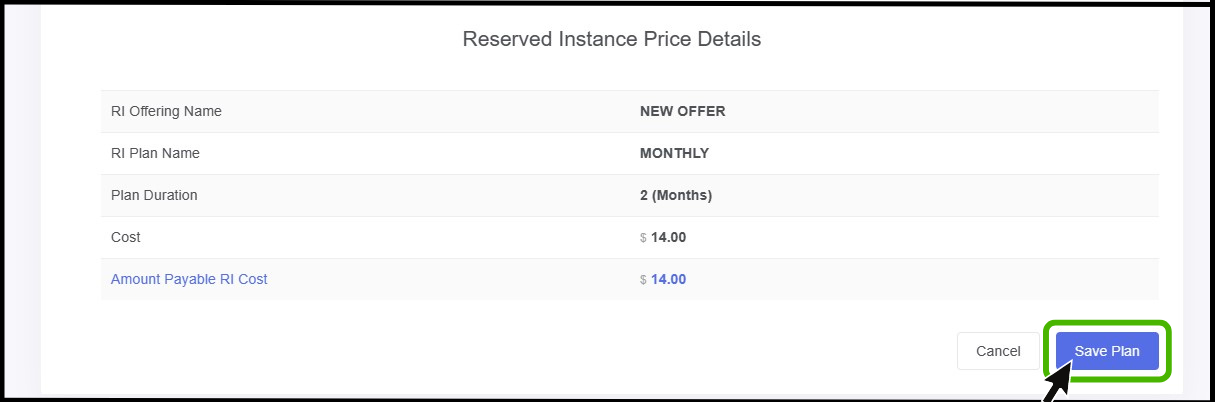
- Finally Click on the SAVE PLAN option.

- Now the Reserved offering is successfully configured.
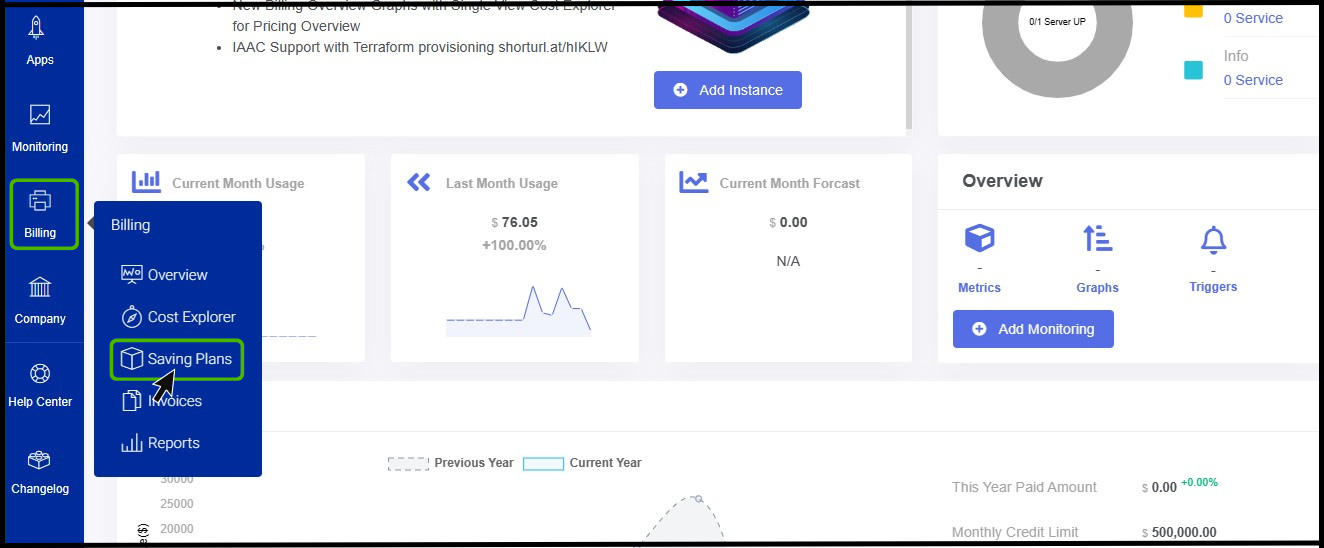
Configure saving plan offering using the configuring saving plan option
Method 2
Now we will configure saving plan offering using the second method as configuring saving plan option.
The billing option can be found on the left side of the panel.
Click on it to view the drop-down menu.
From the drop-up select the Savings plan.
- Saving Plan screen appears on the screen.
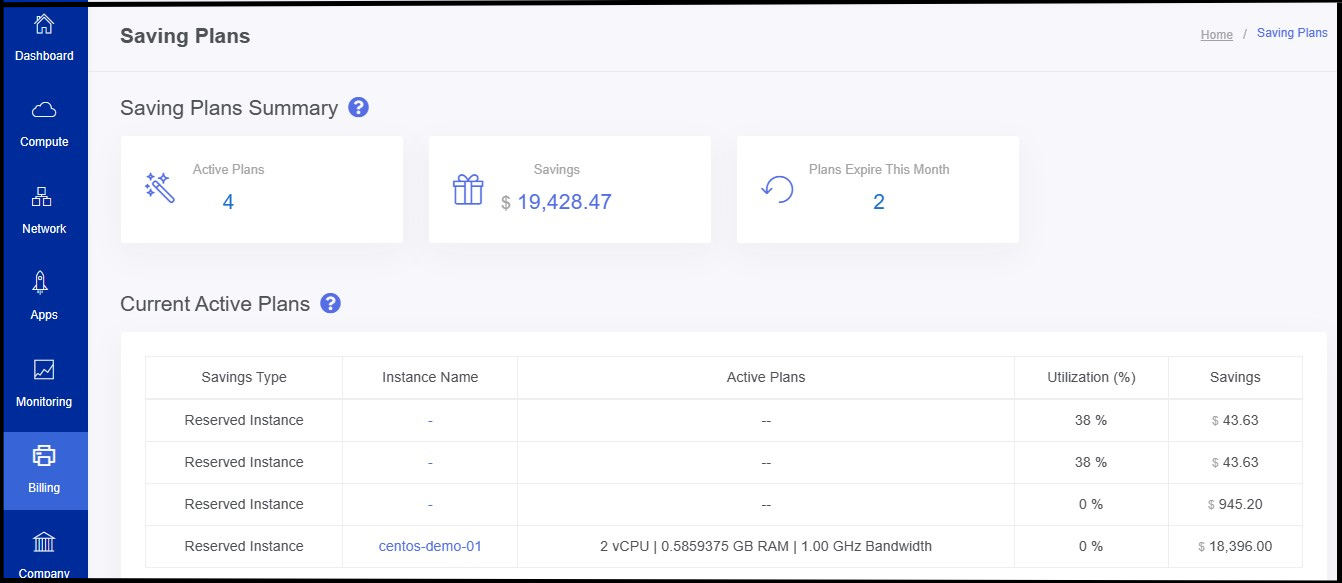
- Active plan - Here you can see how many Reserved plans are in active.
- Savings - Using the reserved instance policy, you will be able to see how much amount has been saved by offering saving plan.
- Plans expire this month - In this section, you can see the plans that going to expire this month.
- Current Active Plans - This section shows the Current Active Plan and necessary details.
- At the bottom of the page you can able to see an option called Purchase Saving Plan.
- Click on it to Purchase a Saving plan for your resource.
- Purchase a Saving plan screen appears.
- Here you can choose the offering as per the requirement.

Reserved offering type - There are two types of reserved offering they are STANDARD and CONVERTABLE.
STANDARD OFFERING - Users who select the standard offering cannot upgrade or downgrade the offering; they can only maintain the same offering they configured initially.
CONVERTABLE OFFERING - If users select the convertible offering, they can upgrade or downgrade the offering at any time.
RI Plan name
- Select the RI plan (i.e. yearly or monthly coverage).
Instance
- In this case, the user wants to select the VM on which a saving plan will be configured.
- Finally Click on the SAVE PLAN option.
- Now the Reserved offering is successfully configured.
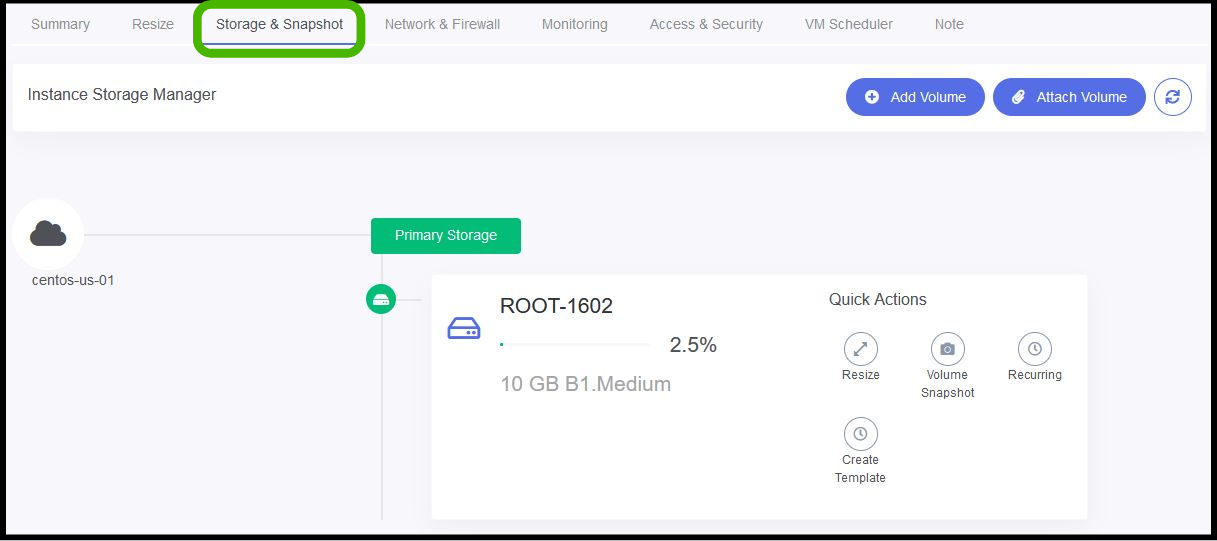
Storage and Snapshot
- This section will provide you the functionality to add additional storage to your virtual instance. Also, there are few enhanced features for your virtual storage such as Resize, Volume snapshot, Recurring Snapshot & Create Template.
Network & Firewall
One of the most essential part for your virtual instance is Network and Firewall. This section provide you various features to add additional functionality & security for your virtual instances.
In addition to this, Load balancer feature will be included to all the source NAT IP under each isolated network.
Please refer the Networking section for more information.
Monitoring agent in StackBill CMP
Stackbill Portal will provide you the detailed monitoring feature to monitor your virtual resources like CPU Usage, Memory Consumption, I/O, Network, Disk Usage, Process etc.
Please refer monitoring section for more information.
Access & Security
- Stackbill CMP will provide additional security features to your virtual machines such as SSH key pair. You can able to add or upload existing SSH key pair under this section.
VM Scheduler in StackBill CMP
- VM Scheduling is process of start or stop your virtual machines automatically at certain date and time. Using Stackbill CMP you can achieve this.
With StackBill's VM scheduler, you can start and stop instances automatically. You can manage instances more efficiently by automating the process with a VM scheduler. You can set up instance schedules for both on-off workloads.
For example, use VM scheduler to only run VM instances during working hours.
The Vm Scheduler Guide for StackBill CMP is provided below.
- Compute option can be found on the left side of the panel click on it view the pop up.
- From the pop up click on the instance option.
- Click on the particular instance.
- Now the summary of the particular instance appears on the screen.
- At the right side of the panel you can see a option for Vm scheduler, Click on it.
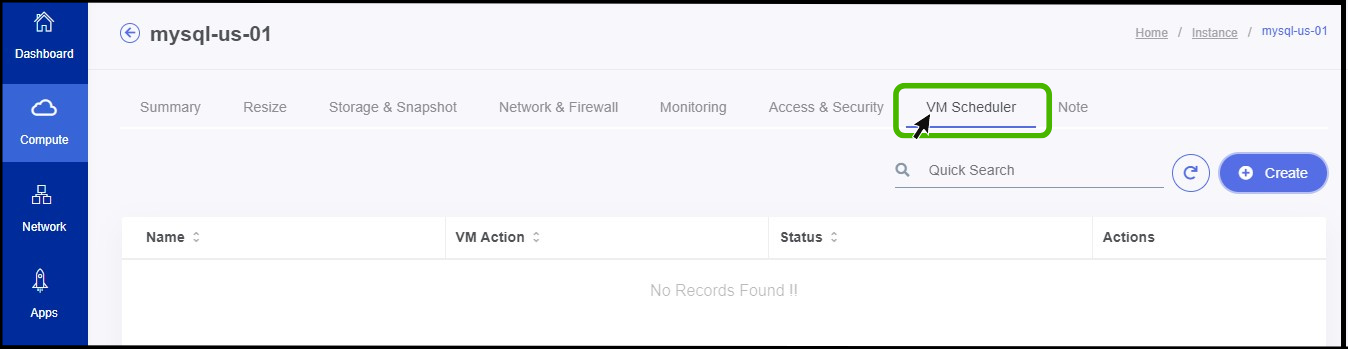
- Click Create on the button.
- VM Scheduler screen appears on the screen.
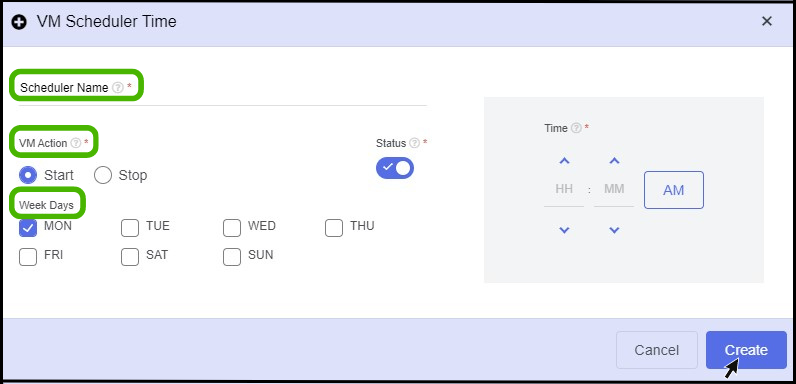
- Scheduler name - Give a name for the scheduler.
- VM Action - Here select the action that you are going to set (i.e start or, stop).
- Week days - Here select the specific days that Instance should perform.
- Time zone - Mention a specific time zone to perform the scheduler process on the specific time.
- Finally click create button.
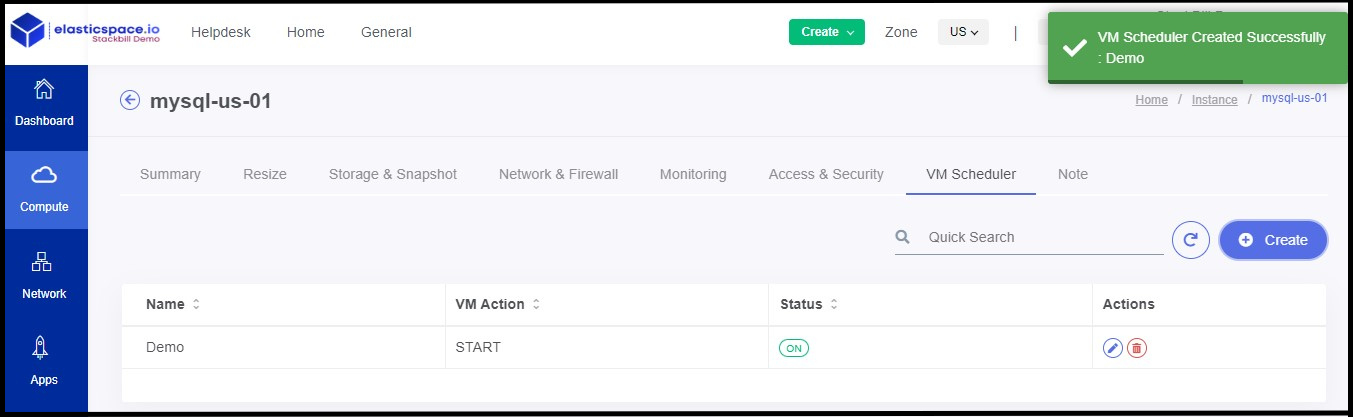
- Now the VM scheduler has been created successfully.
Notes
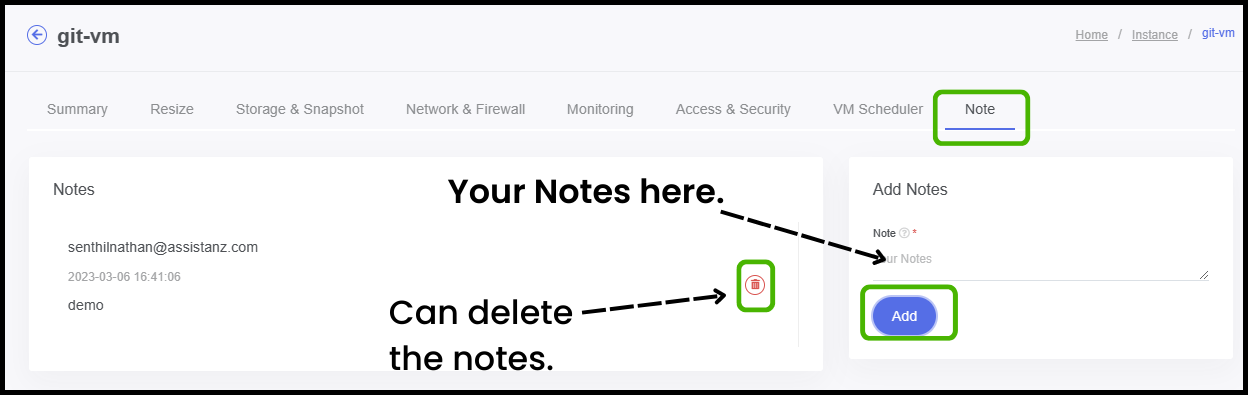
- Notes - In this option the user can take notes.
About StackBill
StackBill is a complete self-service intuitive Cloud Management Portal with extensive features leveraging Apache CloudStack® with state of art years of expertise.